When using Task Scheduler in Windows, users often encounter a significant difference in the execution time of the same resource-intensive task when run manually versus automatically. The discrepancy arises because tasks initiated via Task Scheduler are assigned a default low process priority. This low priority leads to reduced CPU time, causing these tasks to execute more slowly, particularly on systems under heavy load. For instance, a Python script executed through Task Scheduler may take nearly three times longer to complete compared to when it is run interactively via the command line.
To inspect the priority of a currently running process, users can access the Task Manager, go to the Details tab, locate the appropriate executable, right-click it, and choose Set priority. This feature enables users to adjust the process priority as needed, or they can add the Base priority column to their view.
Unfortunately, the Task Scheduler interface does not allow direct changes to the task priority. Previously, this could be achieved by editing the task’s XML configuration file. Here’s how to do it:
- Launch the Task Scheduler by executing
taskschd.msc. - Right-click the target task and export it as an XML file.
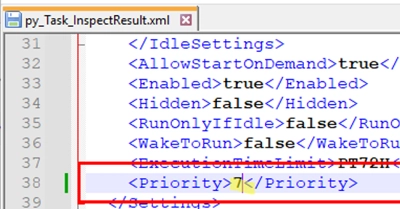
- Open this XML file in any text editor. Here, you’ll find the Priority option set to a numeric value; the default is 7, indicating Below Normal priority.
- Adjust the value to 5 for Above Normal priority. Keep in mind that priority values range from 0 (Highest – Realtime) to 10 (Lowest – Idle/Background).
- Save the modified XML file, delete the original task from Task Scheduler, and import the edited task back into the scheduler.
Once properly imported, the task’s execution will now run with a higher normal priority. However, be cautious—any changes made through the Task Scheduler GUI will reset this priority back to the default value of 7, requiring re-export and modification each time.
For those using PowerShell 3.0 and newer, the ScheduledTasks module allows for the management of task priorities with specific cmdlets. To adjust the priority of a task, you can define its name in the following script:
$mTaskName= "your_task_name"$mPriority = New-ScheduledTaskSettingsSet -Priority 5Set-ScheduledTask -TaskName $mTaskName -Settings $mPriorityTo check an existing task’s priority:
$mTaskName= Get-ScheduledTask -TaskName "your_task_name"$mTaskName.Settings.PriorityUtilizing the New-ScheduledTaskSettingsSet and Set-ScheduledTask cmdlets means that priority settings will remain intact, even if the task settings are altered later.
Additionally, when deploying scheduled tasks to user machines via domain Group Policies, priority can also be modified in the policy’s XML configuration stored in the SYSVOL folder by editing the Priority parameter in the <Settings> section. This flexibility ensures that administrators can better manage task executions across various environments.