The feature RemoteFX vGPU was previously accessible in older Hyper-V versions (starting from Windows 7 and Windows Server 2008 R2) to allocate a host’s discrete GPU to a virtual machine. However, with the release of Windows 10 version 1809 and Windows Server 2019, the support for RemoteFX was discontinued. The upgraded feature, Discrete Device Assignment (DDA), is now recommended.
Discrete Device Assignment permits the passthrough of physical host PCI/PCIe devices such as GPUs and NVMes directly to a Hyper-V virtual machine. The essential prerequisites for implementing DDA in Hyper-V include:
- Exclusively applicable to Hyper-V Gen 2 virtual machines;
- Virtual machines must have both dynamic memory and checkpoints disabled;
- The physical graphics card needs to support GPU Partitioning;
- If WSL (Windows Subsystem for Linux) is active on the host system, the VM might display a code 43 video error when the graphics card is used with GPU-P;
- Despite SR-IOV (Single Root Input/Output Virtualization) not being a mandatory requirement for DDA, GPU passthrough will face issues without its support.
Discrete Device Assignment is only available on Windows Server with the Hyper-V role. In the desktop Windows 10 and 11, you can use GPU partitioning to share the video card with the virtual machine. This article describes how to assign a physical GPU to a virtual machine on Hyper-V.
Enable GPU Passthrough to Hyper-V VM on Windows Server
Discrete Device Assignment (DDA) allows PCIe devices to be passed through to a virtual machine on Windows Server 2016 and newer.
Before assigning the GPU to the VM, you must change its configuration.
Disable Hyper-V automatic snapshots for VM (described in the post Manage VM startup and boot order on Hyper-V).
Set-VM -Name munGPUVM1 -AutomaticStopAction TurnOff
Configure cache and memory limits for 32-bit MMIO space:
Set-VM -Name munGPUVM1 -GuestControlledCacheTypes $True -LowMemoryMappedIoSpace 3Gb -HighMemoryMappedIoSpace 33280Mb
Next, determine the physical path to the graphics card’s PCIe device on the Hyper-V host. To achieve this, access the GPU Properties via Device Manager, switch to the Details tab, and locate the Location Paths property. Look for and copy the value that begins with PCIROOT.
Alternatively, you can use PowerShell to retrieve this path value:
Get-PnpDevice | Where-Object {$_.Present -eq $true} | Where-Object {$_.Class -eq "Display"}|select Name,InstanceId
Disable this graphics card on the Hyper-V server in Device Manager or using PowerShell:
Dismount-VmHostAssignableDevice -LocationPath "PCIROOT(0)#PCI(0300)#PCI(0000)" –force
Now connect the physical host GPU adapter to the virtual machine:
Add-VMAssignableDevice -VMName VMName -LocationPath "PCIROOT(0)#PCI(0300)#PCI(0000)"
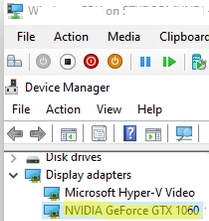
Then power on the VM and check that your GPU appears in the Display Adapters section of the Device Manager, along with the Microsoft Hyper-V Video device.
To disconnect the GPU from the VM and connect it to the host:
Remove-VMAssignableDevice -VMName munGPUVM1 -LocationPath $locationPath

Mount-VMHostAssignable
Device -LocationPath $locationPath
Sharing the Physical GPU with Hyper-V VM on Windows 10 or 11
GPU Partitioning (GPU-P) is now supported in Hyper-V virtual machines that are equipped with Windows 10/11 starting from build 1903 onwards.
To determine if your video card is compatible with GPU partitioning, you can use the Get-VMPartitionableGpu command on Windows 10 or the Get-VMHostPartitionableGpu on Windows 11.
To allocate a video adapter from the host to a virtual machine, execute the Add-VMGpuPartitionAdapter cmdlet. Transfer the graphics card drivers from the Hyper-V host to the virtual machine using the Easy-GPU-PV script available at https://github.com/jamesstringerparsec/Easy-GPU-PV.
After downloading, unzip the script archive into a designated folder on your Hyper-V host.
Open an elevated PowerShell console, then allow running PowerShell scripts in the current session.
Set-ExecutionPolicy -Scope Process -ExecutionPolicy Bypass –Force
Run the script:
.Update-VMGpuPartitionDriver.ps1 -VMName myVM1 -GPUName "AUTO"
The script copies the GPU drivers from the host to the VM.
Now change the VM settings and assign the GPU to it:
Set-VM -VMName myVM1 -GuestControlledCacheTypes $true -LowMemoryMappedIoSpace 1Gb -HighMemoryMappedIoSpace 32Gb

Add-VMGpuPartitionAdapter -VMName myVM1
If you have updated the video drivers on the Hyper-V host, you must also update them on the virtual machine.
.Update-VMGpuPartitionDriver.ps1 -VMName myVM1 -GPUName "AUTO"