To migrate existing Windows shares to a new file server, you’ll need to utilize a combination of registry editing and file transfer methods. The shared network folders and their settings are stored under HKLMSYSTEMCurrentControlSetServicesLanmanServerShares in the Windows registry.
Step-by-Step Guide for Migration:
-
List Existing Shares:To view current shared SMB resources on a Windows host, use the following commands in PowerShell:
net shareor
Get-SmbShare -
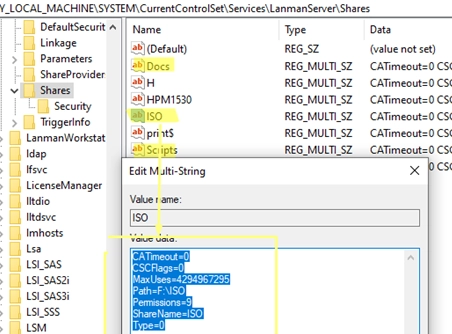
Access the Registry:Open the Registry Editor and navigate to:
HKEY_LOCAL_MACHINESYSTEMCurrentControlSetServicesLanmanServerSharesHere, you will find the settings and permissions for the shared folders.
-
Understand Share Settings:Each shared folder has several configurable options:
- CATimeout: Client connection timeout.
- CSCFlags: Offline file caching option.
- MaxUses: Maximum number of concurrent connections.
- Path: Local path to the shared folder.
- Permissions: Defines share permissions (distinct from NTFS permissions).
- ShareName: The name of the shared folder.
-
Export Registry Key:You can export the
HKEY_LOCAL_MACHINESYSTEMCurrentControlSetServicesLanmanServerSharesregistry key to a.REGfile for migration. Open the.REGfile in a text editor and remove any administrative folders, printers, or shares that you do not want to migrate. -
Transfer Files:Based on your setup, there are three standard approaches for copying files from the old server to the new one:
- For virtual servers: Reattach the virtual disk containing the files to the new VM.
- Use the
Robocopycommand:robocopy f:docs ew-srv2f$docs /MIR /COPYALL /B /E /Z /R:2 /W:5 /LOG:f:files_copy.log - Configure the new server as a replication target via DFS.
-
Import Registry Settings:After transferring the files, import the modified
.REGfile on the new file server by double-clicking it. This step adds the shared folder settings to the new server. -
Refresh the Server:To apply the changes, either restart the
LanManServerservice or create/delete a dummy network folder:Restart-Service server -
Verify Shares:Finally, ensure that the newly created shared folders appear on the new file server and that the local paths are correct.
This process not only aids in migration but can also be utilized for backing up and restoring shared folder settings and permissions. Use the commands as needed for exporting and importing registry keys:
reg export HKLMSYSTEMCurrentControlSetServicesLanmanServerShares %UserProfile%DocumentsMyShares.regreg import %UserProfile%DocumentsMyShares.regFor NTFS object permissions backup, consider using the icacls.exe command for thorough permissions management.