If you aim to further your knowledge of M365, a live environment is not ideal for experimentation. It is either actively in use or lacks the full functionality, as it would typically be too expensive for a lab setup.
M365 Developer Program
In this situation, a free developer license comes in handy. As the name suggests, this is primarily aimed at developers but is also suitable for admins who want to get involved with M365 administration.
To set up an M365 environment for testing purposes, you first have to go through the registration process and then run the setup for the sandbox.
Register for the dev program
The process starts at the M365 Dev Center, where you join the developer program. In the first step, you are prompted to sign in with a Microsoft account. If you prefer to keep the lab environment separate from your other accounts and subscriptions, it is advisable to create a new account specifically for this purpose.
Create a new account for the M365 sandbox.
After signing in, the three-step registration wizard launches. In the first dialogue, it requests input for the region, company, and preferred language. First and last names are already set, so FNU LNU in the following screenshot is not the work of a prankster.
Create a profile for the M365 Developer program
You will then be asked for the target group of the planned M365 programming, where you can also select Personal Projects. Then, choose the apps you wish to develop for. Admins might be interested in Microsoft Graph, as it provides a PowerShell API for many M365 services.
Selecting the platform for M365 development
Configure the sandbox
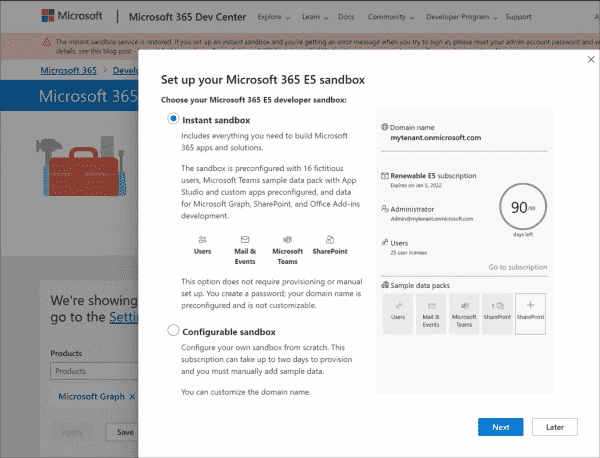
The next step is to set up the M365 E5 sandbox. Here, you have the option between instant and configurable. The Instant version includes 16 fictional users, and with the 25 licenses, you can later set up nine more accounts. Sample data for Teams and other applications is also included.
Choosing the desired M365 Sandbox
The deployment of the configurable variant may take several days and provides the option, among other things, to manually create all 25 users. However, most users will likely opt for the standard sandbox.
In the next step, you set the name for the admin and have the option to assign a separate password for the fictitious accounts.
Configure the admin account and assign passwords
Following this, you need to verify a phone number. If you’re creating a second sandbox, you’ll need a new number. Otherwise, you’ll be informed that you must delete the existing environment first.
Verification of a phone number using an SMS code
With this, the wizard is complete, and the subscription overview page indicates that the sandbox is available for 90 days. However, regular usage automatically extends this period. Now, click on the Go to subscription link to sign in to Azure AD (“Entra ID”) using the previously created admin account.
For authentication, the security defaults are configured, requiring a modern authentication method. However, they still allow password-based sign-ins for a limited time, so you may simply continue to set up the lab.
Setting up M365
In the Admin Center the next wizard for the guided setup is ready to be started. In the first step, it suggests installing the Office apps, but this can be done later at your convenience.
Initiating the Setup for the M365 lab
Subsequently, there is an option to use a custom domain instead of the subdomain for onmicrosoft.com. However, for a lab, the provided subdomain is usually sufficient.
Use either the default subdomain or your own domain for the tenant.
Lastly, you’ll be presented with an option to create additional users. However, this can also be done later through the M365 Admin Center, which you will return to after completing the wizard. The navigation there provides links to various admin centers, including the one for Exchange.
An overview of all consoles is available via the All admin centers menu item.
List of all management consoles for the M365 services
If you’re searching for Intune, it’s not mentioned here. However, you can still reach the corresponding Admin Center through the Endpoint Manager link.