Prerequisites
To proceed with this tutorial, you will need the following:
- An Ansible management node with Ansible installed and configured
- An Ansible target node
- SSH key-based authentication between the management node and the target node
Check out our introductory articles in this Ansible beginner’s tutorial, where we explain how to configure the necessary prerequisites.
Encrypting data with Ansible Vault
Ansible Vault uses symmetric encryption to protect data. To create a new encrypted file, use the ansible-vault create command followed by the name of your new file:
ansible-vault create secrets.yml
You will be prompted to enter a password. This password will be used to encrypt the file.
New Vault password:Confirm New Vault password:
After entering the password, you will be taken to an editor where you can enter your sensitive data:
db_password: mysecretpassword
Save and close the file. Your data is now encrypted. You can view the encrypted data using this command:
cat secrets.yml
Viewing encrypted data
To view the contents of an encrypted file named secrets.yml using Ansible Vault, you can use the ansible-vault view command.
ansible-vault view secrets.yml
After running this command, Ansible Vault will prompt you to enter the vault password. Once you provide the correct password, it will decrypt and display the contents of the secrets.yml file in your terminal.
Editing encrypted files
If you want to edit an encrypted file, you can use the ansible-vault edit command:
ansible-vault edit secrets.yml
You will be prompted to enter your password when creating the file.
Vault password:
After entering the password, you can view and edit your sensitive data.
db_password: mysecretpassword
When you save the file, Ansible Vault will encrypt it again.
Decrypting encrypted files
If you want to store the file in plaintext, you can use the ansible-vault decrypt command:
ansible-vault decrypt secrets.yml
You will be asked to enter your vault password to decrypt the file.
Vault password:Decryption successful
The cat command allows you to view the decrypted file.
cat secrets.yml
Output.
Changing the vault password
Rotating your vault passwords periodically is a wise move to boost security. You can conveniently re-encrypt existing files with a new password using Ansible Vault.
If you need to rekey an encrypted file named secrets.yml, you can use the ansible-vault rekey command:
ansible-vault rekey secrets.yml
After you provide the correct password, Ansible Vault will ask for the new vault password. After confirming the new password, Ansible Vault will re-encrypt the file with the new password.
Running Playbooks with vaulted files
There are two methods to run an Ansible playbook with a vault password: –ask-vault-pass and vault_password_file
Using –ask-vault-pass
You can provide the vault password interactively during playbook runtime by using the –ask-vault-pass option.
ansible-playbook playbook.yml --ask-vault-pass
Ansible will prompt you to enter the vault password before executing the playbook.
Using a vault password file
You can also store the vault password in a plaintext file and reference it in your Ansible configuration file using the vault_password_file parameter. This method eliminates the need to enter the vault password interactively.
nano /etc/ansible/ansible.cfg
Add the following line to define the path of your vault password file:
[defaults]vault_password_file = /etc/ansible/vault_password.txt
Next, create a file to store the vault password.
nano /etc/ansible/vault_password.txt
Add your vault password:
YourVaultPassword
Ensure that the vault password file contains only the password and restrict access permissions to prevent unauthorized usage. You can now run your playbook as usual without providing a vault password.
Using Ansible Vault in a playbook
An Ansible playbook is used in this example to create a MySQL database. Ansible Vault securely stores the root and user password.
To begin with, a vars directory needs to be created.
mkdir vars
Subsequently, a new vault file should be created to store the MySQL root and user password:
ansible-vault create vars/mysql_vault.yml
When prompted, enter the vault password and then add the following lines to define your passwords:
mysql_root_password: SecureRootPasswordmysql_user_password: SecureUserPassword
Next, create an Ansible playbook that uses this password to create a new MySQL database and user on a remote node.
nano mysql_setup.yml
Here is the content that needs to be added.
---
- name: Generate MySQL Database and User
hosts: node1
vars_files:
- vars/mysql_vault.yml
tasks:
- name: Launch MySQL service
service:
name: mysql
state: started
- name: Establish database
mysql_db:
name: wp_db
state: present
login_user: root
login_password: "{{ mysql_root_password }}"
- name: Set up database user
mysql_user:
name: wp_user
password: "{{ mysql_user_password }}"
priv: "wp_db.*:ALL"
state: present
login_user: root
login_password: "{{ mysql_root_password }}"
This is what the above code signifies:
- vars_files: This directive includes the file mysql_vault.yml, where the encrypted variables are stored.
- mysql_root_password: This variable stores the encrypted MySQL root password.
- mysql_user_password: This variable stores the plaintext password for the new MySQL user.
- mysql_db: This task creates a MySQL database named wp_db.
- mysql_user: This task creates a MySQL user named wp_user with a specified password and grants privileges on the my_database.
Finally, run the playbook with the following command:
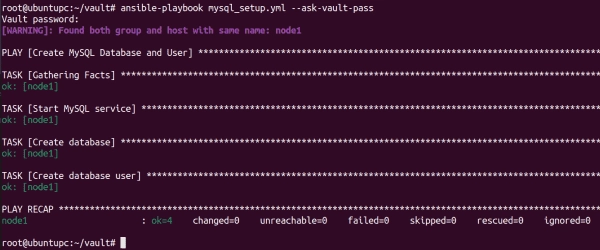
ansible-playbook mysql_setup.yml --ask-vault-pass
Before the playbook is executed, you have to enter the vault password. The playbook will then read the MySQL root password from the vault file and use it to create the database and user.
Subscribe to 4sysops newsletter!
Creating database and user using Ansible vault
Conclusion
In this tutorial, you learned how to encrypt and decrypt sensitive data using Ansible Vault. We have also used Ansible Vault in a playbook to create a MySQL database with root and user passwords. Encrypting sensitive information is a must if security matters in your environment.
