Before deploying to clients, it’s critical to update a Windows image with the most recent patches and tailor it according to their requirements. Depending on your deployment technique, the WIM archive may need to be provided on a bootable ISO file. This is something that can be achieved with the tools offered in the Windows Assessment and Deployment Kit (ADK).
For those who use Windows Deployment Services (WDS) for OS installation, WIM archives can be deployed directly. This principle is the same when using the Microsoft Deployment Toolkit (MDT), however, it’s worth noting that both WDS and MDT are no longer officially backed for Windows 11.
Use cases for installation from ISO
In cases where computers are booted for Lite Touch Installation from a local disk, the typical approach is to use a bootable USB drive with Windows PE. Alternatively, the ADK can also support the creation of an ISO file for WinPE.
Following this, a possibility is to mount the ISO from WinPE and initiate the setup from this point. This is particularly handy for virtual machines as they can be booted directly from the ISO.
Incorporating a customized WIM file
In order to craft ISO install media using a personalized WIM image, mount the Microsoft ISO and duplicate its contents to another directory. Following this, replace the initial install.wim in the sources folder with the version you’ve customized.
The WIM archive containing the installation files is located in the sources directory
Now, you need to write this directory tree back into a bootable ISO file. Several free tools, most of which offer a graphical interface, are available for creating an ISO from a folder. However, many of them have not been updated for quite some time.
Generating an ISO with oscdimg
Since the Windows ADK includes its own tool for this purpose (oscdimg.exe), you don’t need to spend time searching for a usable tool among the free offers.
The installation of the deployment tools also includes oscdimg.exe
The downside of oscdimg.exe is that it is a console program with numerous options. However, since many of these parameters are no longer relevant, you can limit yourself to a handful of switches.
After installing the ADK Deployment Tools this program is located in the directory %ProgramFiles(x86)%Windows Kits10Assessment and Deployment KitDeployment Toolsamd64Oscdimg. Additionally, the folder contains the boot sector files for both UEFI (efisys.bin) and BIOS (etfsboot.com).
When using the command prompt provided by the ADK to create the ISO, oscdimg.exe is already in the search path.
The deployment tools environment extends the search path to oscdimg.
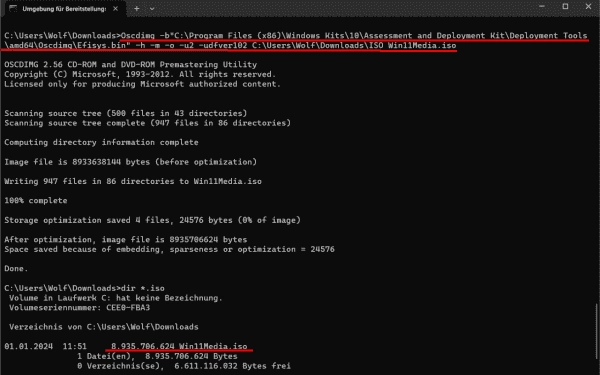
Then you could execute the command like this:
Oscdimg.exe -b"C:Program Files (x86)Windows Kits10Assessment and Deployment KitDeployment Toolsamd64OscdimgEfisys.bin" -h -m -o -u2 -udfver102 C:UsersmeISO Win11Media.iso
Create bootable ISO with oscdimg.exe
Explanation of the options used
The -b parameter is used to specify the file for the boot sector. In our example, this is Efisys.bin for the GPT layout. The -h option ensures that hidden files are also copied, and -m ignores the maximum permitted size for ISO, which is specified by the capacity of physical CDs or DVDs.
The -o switch stands for optimize and uses an MD5 hash to prevent files from being copied twice. Finally, -u2 specifies that only the UDF file system is created and that ISO 9660 is omitted. The -udfver102 switch specifies the file system’s version.
After the options, the first parameter is the root of the directory tree that you want to write to the ISO. The last parameter is the ISO file name.
Subscribe to 4sysops newsletter!
Newsletter