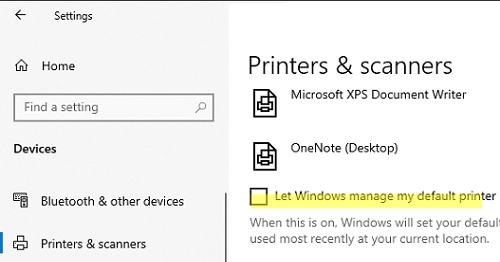
Microsoft has changed how the default printer is assigned in Windows 10 and 11. Windows now always sets the default printer to the last printer the user successfully printed to in the current location. This means that if you print to different printers, the default printer may constantly change. Let’s look at how to set the default printer using the Windows GUI, command prompt, or Group Policies.
Set a Default Printer Using the Windows Control Panel
The default printer can be set in Windows via the Settings pane.
- Navigate to Settings -> Printers and Scanners
- Disable the “Let Windows manage my default printer” option to prevent Windows from automatically changing your default printer.
- Then select the printer you want to set as the default and click Manage.
- Click Set as default.
The classic Windows Control Panel can also be used to set a default printer. Go to Control Panel -> Device and Printer (or run the command shell:PrintersFolder). Right-click on the printer and select Set as default printer.
Change a Default Printer from the PowerShell Command Prompt
The wmic tool can be used to change a default printer from the command prompt. List installed printers:
wmic printer get name,default
The default printer has the Default=True attribute enabled.
Change the default print:
wmic printer where name="Brother MFC-L2750DW" call setdefaultprinter
In addition, you can use PowerShell to manage printers.
List printers:
Get-CimInstance -ClassName CIM_Printer | select name,default
Assign a default printer:
$Printer = Get-CimInstance -Class Win32_Printer -Filter "Name='HP LaserJet M1530 MFP Series PCL 6'"

Invoke-CimMethod -InputObject $Printer -MethodName SetDefaultPrinter
Get-WMIObject cmdlet is not supported in new versions of PowerShell Core 7.x.Enable the LegacyDefaultPrinterMode registry parameter to prevent Windows from automatically changing the default printer:
REG ADD "HKCUSOFTWAREMicrosoftWindows NTCurrentVersionWindows" -v LegacyDefaultPrinterMode /t REG_DWORD /d 1 /f
How to Set a Default Printer with GPO
If you need to set the default printer for many users in an Active Directory domain from a central location, you can use a GPO.
In case you are using Group Policy to assign shared printers to users (User Configuration -> Preferences -> Control Panel Setting -> Printer), enable the Set this printer as the default printer option in the GPP item.
The user’s default printer set is stored in the Device parameter under the HKEY_CURRENT_USERSoftwareMicrosoftWindows NTCurrentVersionWindows registry key. The following string format is used:
Brother MFC-L2750DW series,winspool,FILE:
Use the GPO to create this registry parameter on the target user computers. This will change the default printer set in the user profile. Edit a domain GPO, go to User Configuration -> Preferences -> Windows Settings -> Registry, and create a new item with the following settings:
- Hive:
HKCU - Key Path:
SOFTWAREMicrosoftWindows NTCurrentVersionWindows - Value Name:
Device - Value Type:
REG_SZ - Value Data:
Brother MFC-L2750DW series, winspool, FILE:
Then disable automatic printer assignment in Windows using the GPO option Turn off Windows default printer management (User Configuration → Administrative Templates → Control Panel → Printers).
