Modern versions of Windows come equipped with a built-in NFS (Network File System) client that allows users to mount NFS directories directly from Linux hosts or NAS devices. This functionality enables seamless access to files and folders on NFS volumes through Windows File Explorer, much like accessing SMB (Server Message Block) mapped drives. Below, we explore how to enable the NFS client in Windows, mount an NFS network volume, and configure user mappings between Windows and Linux.
How to Enable an NFS Client on Windows
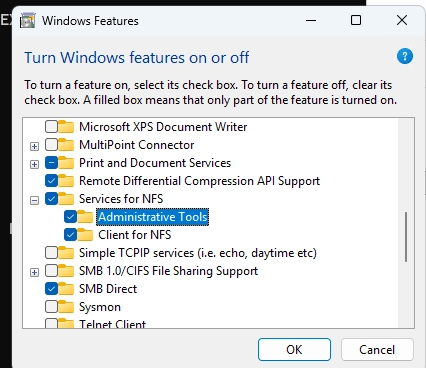
Starting with Windows 10, all modern versions feature a built-in NFS client that is disabled by default. To enable it, navigate to the Windows Features control panel. Run the command optionalfeatures.exe, expand Services for NFS, and enable Client for NFS, including management tools.
Alternatively, you can enable the NFS client using PowerShell. For desktop operating systems (Windows 10 and 11), use:
Enable-WindowsOptionalFeature -FeatureName ServicesForNFS-ClientOnly, ClientForNFS-Infrastructure -Online -NoRestartFor Windows Server, the command is:
Install-WindowsFeature NFS-ClientTo check the available NFS client settings, run:
Get-NfsClientConfigurationMount an NFS Share on Windows
You can mount NFS network volumes using either Windows Explorer or command line tools like PowerShell or CMD. In Windows Explorer, select the Map network drive option, provide the network path to the NFS share (using the UNC format such as \192.168.123.123fsshare), and designate a drive letter.
For advanced options, mounting from the command line is preferable.
In PowerShell or CMD, run:
mount.exe -o anon \192.168.123.123fsshare N:This command mounts an NFS folder with an anonymous user. Replace the details with your NFS server’s IP address and path. To ensure compatibility with Linux’s case sensitivity, you can add casesensitive=yes.
The PowerShell equivalent is:
New-PSDrive -PSProvider FileSystem -Name N -Root \192.168.123.123fsshare -PersistThis preserves the connection across reboots, as opposed to the mount.exe command, which does not offer this option.
When accessing the NFS folder in Explorer, a new tab entitled NFS Attributes will display file permissions and ownership details.
However, note that files with non-Latin characters may not be displayed correctly. To remedy this, you can enable UTF-8 support in Windows by checking “Beta: Use Unicode UTF-8 for worldwide language support” in the system locale settings.
To unmount the NFS share, use:
Remove-PSDrive Nor
umount.exe M:Configuring User Mappings
While anonymous access to NFS is straightforward, it presents security concerns. It is advisable to configure a mapping of Windows users to their corresponding Linux UID (User ID) and GID (Group ID).
To set this up in an Active Directory (AD) environment:
Set-NfsMappingStore -EnableADLookup $trueSet-NfsMappedIdentity -MappingStore AD -UserName "j.smith" -UserIdentifier 1000 -GroupIdentifier 100Alternatively, for local machines where AD is not utilized, you can edit the passwd and group files located in C:\Windows\System32\drivers\etc to correspond Windows usernames to Unix UID/GID.
For instance, to add a local user maxadm1:
In passwd:
user1:x:1000:100:maxadm1:C:Usersmaxadm1And in group:
users:x:100:maxadm1Mapping a specific Windows user can be checked using:
Get-NfsMappedIdentity -AccountName user1 -AccountType UserFor those who wish to change the default UID/GID for anonymous connections, the corresponding registry parameters can be adjusted under:
HKLMSOFTWAREMicrosoftClientForNFSCurrentVersionDefault
For example, to set UID/GID to 0 (the Linux root user):
reg add "HKLMSOFTWAREMicrosoftClientForNFSCurrentVersionDefault" /v AnonymousUid /t REG_DWORD /d 00000000 /freg add "HKLMSOFTWAREMicrosoftClientForNFSCurrentVersionDefault" /v AnonymousGid /t REG_DWORD /d 00000000 /fOnce changes are made, restart the NFS services to apply configurations.
By following these steps, you can effectively manage NFS shares within a Windows environment, enabling efficient collaboration between Windows and Linux systems.