For implementing a VPN Infrastructure with WireGuard on OPNSense, the following steps have to be executed:
- Install WireGuard
- Construct and configure a WireGuard instance
- Implement a network interface for the VPN server
- Develop a firewall rule for VPN
- Download and calibrate WireGuard client
- Classify clients on the VPN server
- Examine the connection to the WireGuard server
How to integrate WireGuard as an extension
WireGuard VPN needs to be installed initially via System => Firmware => Extensions. The label for this is os-wireguard. Post installation, you can find a new item titled WireGuard under the VPN menu. If this is not visible, you could try refreshing your browser.
WireGuard is installed as an OPNsense extension
Creating a new WireGuard instance
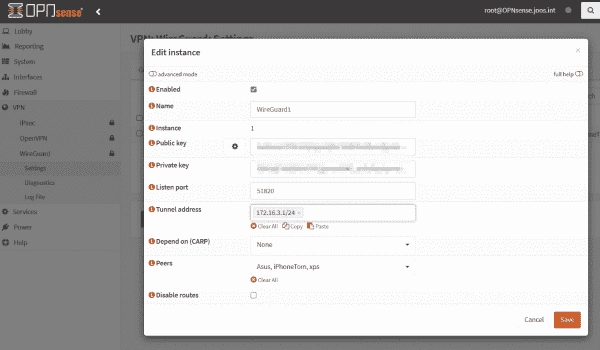
First off, you should create a new WireGuard server on the Instances tab, which is found under VPN => WireGuard. This can be done by clicking the ‘+’ sign. It is possible to run multiple servers on an OPNsense firewall with WireGuard – give your new server a name that will appear on the interface.
For Listen Port, specify the TCP port on which the VPN server will listen for requests. This must also be unlocked in the firewall later. For Tunnel address, enter the subnet where the VPN interface and the clients will be located.
In our example, we work with the subnet 172.16.2.1/24, where the VPN interface receives the IP address 172.16.2.1.
All other fields do not need to be filled. You can disable routes here if you want to create the routing rules yourself. After saving the server’s configuration in OPNsense, click Apply.
OPNsense automatically generates a public key for the VPN server. The key is later needed for the handshake with the clients.
If you open the server’s configuration again, the public key and private key fields are automatically filled in. Copy the key to a text file because we will need it later.
Then, you can activate WireGuard under General, which must be confirmed again by applying.
Activating the WireGuard server on OPNsense
Activating the WireGuard server on OPNsense
Configuring network interfaces for WireGuard
To connect the VPN with OPNsense, the configuration of the VPN interface is required under Interfaces. Under Assignments, the existing interfaces are visible. Here, create the new interface and assign it to the WireGuard VPN.
Assigning an interface to the VPN server
Assigning an interface to the VPN server
By clicking on the new interface, the window with its configuration opens. Here, activate it via the respective checkbox. Moreover, I recommend setting Prevent interface removal to avoid accidental deletion.
Configuration of the network interface for the VPN server
Unbound DNS can be set up on OPNsense for name resolution in the internal network.
OPNsense also offers a DNS service
Creating firewall rules for WireGuard VPN
Next, create a rule under Firewall => Rules => WAN that allows access to the VPN server over the internet.
Select the action Allow and the interface WAN when defining a new rule. For Destination, choose the option in; for TCP/IP Version, select IPv4; for Protocol, select UDP; and for Source, select Any.
It is crucial to select the Destination port range under from and for to to set the port number given during the server’s creation. The setting can be found under VPN => WireGuard. At this point, you can also activate the option Log packets that are handled by this rule.
With another rule, you specify how the traffic of the VPN clients is forwarded to the internal network. When clients connect via VPN, they initially find themselves in the VPN network, whose IP range was specified during the creation of the server.
From this point, they need to access the respective applications in the local network. The configuration of these rules can be done through Firewall => Rules => <WireGuard Interface>. It’s recommended to design these rules in such a way that VPN clients can only access the necessary devices.
For doing so, when creating a new rule, select the action Allow and the interface of WireGuard. For the Direction option, choose in, and for the Protocol option, choose any. Concerning Source and Destination, you can select any if you wish to allow access to all resources in the network.
Installing and adjusting WireGuard clients
Afterward, install the WireGuard client, for example, on Windows. Then, you can configure a new connection by adding a tunnel.
In the first step, assign a name for the VPN connection. Save the value for Public Key again in a text file, as it needs to be entered on the server later.
Under Interface, provide the IP address of the client in the VPN subnet. This was pre-determined during the set up of the VPN server. For illustration, we allot the IP address 172.16.2.11 to the Windows PC. For DNS, input either an internal DNS server or the IP address of the VPN server.
Under PEER, provide the name or the IP address of the VPN server, along with the port under Endpoint. Under AllowedIPs, identify which IP addresses should route the traffic via the VPN tunnel. Here, the subnet 10.0.0.0/16 corresponds to the OPNsense firewall’s LAN.
If you decide that all traffic should direct through the VPN post connection, including the internet, you should provide 0.0.0.0/0 here.
For the PublicKey, input the public key of the WireGuard VPN server, which you had stored earlier in a text file. The public key of the client goes into the WireGuard server’s configuration.
Configuring VPN clients in WireGuard
Configure the VPN clients on the OPNsense web interface on the Peers tab under VPN => WireGuard => Settings. Create a new client by clicking the plus sign and setting its name.
Copy the client’s public key into the Public Key field. For Allowed IPs, enter the IP address assigned to the client in its configuration.
Creating and configuring a VPN client
A pre-shared key can be helpful in a production environment, but we omit it in the test environment. Save to create the client.
Then, switch to Instances and open the settings of the WireGuard server. Under Peers, check the new client so the server accepts it upon connection.
Here is a visual guide of allowing a new client through the OPNsense console.
Afterward, I recommend restarting the WireGuard service via Lobby => Dashboard.
Establishing a connection with the VPN client
You can now test a connection on the client. The value for received and sent data should increase. If it remains at 0, the handshake did not work.
In this case, check if the server and client’s public key have been configured correctly. Also, the client must be entered in the server’s settings under Peers.
The protocol shows information about the connection, and the OPNsense firewall displays the connections under VPN => WireGuard => Diagnostics. Here, all active clients are visible.
Summary
To install WireGuard on OPNsense, you need to add an extension. After configuring its interface, the name resolution is handled with Unbound DNS, another OPNsense service.
Subscribe to 4sysops newsletter!
Firewall rules determine which resources the clients can access. Finally, the VPN clients are set up, for which the server’s public keys and clients must be entered into each other’s configuration.