Wake on LAN (WoL) is an essential feature in computer networking that allows a device in sleep mode or low power mode to be remotely activated. This is made possible through the device’s network interface card (NIC), which prompts the computer to wake up anytime it receives a unique broadcast packet, often referred to as a “magic packet,” that contains its MAC address. This article will provide guidance on how to enable and use Wake on LAN on a Windows device.
To begin, it’s necessary to activate Wake-on-LAN in your computer’s BIOS/UEFI firmware settings. This option may be listed under different names depending on the model and firmware version of your computer. Some possibilities include:
- WOL (Wake-on-LAN)
- Power On By PCI-E
- Resume by PCI-E Device
- Resume by PME
- S4/S5 Wake on LAN
- ErP
$getLenovoBIOS = gwmi -class Lenovo_SetBiosSetting -namespace rootwmi
$getLenovoBIOS.SetBiosSetting("WakeOnLAN,Enable")
$SaveLenovoBIOS = (gwmi -class Lenovo_SaveBiosSettings -namespace rootwmi)
$SaveLenovoBIOS.SaveBiosSettings()
Then enable Wake on LAN (WOL) in the settings for your network adapter in Windows.
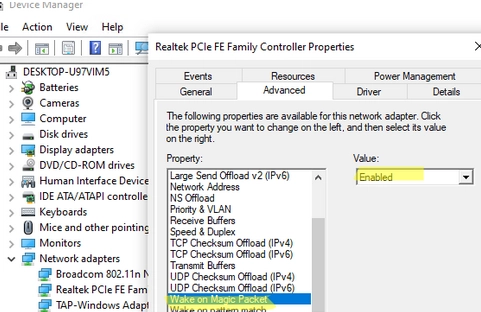
- Open the Device Manager console (
devmgmt.msc); - Open the properties of your physical NIC in the Network Adapters section;
- Go to the Advanced tab and make sure the Wake on magic packet option is enabled (the option name may vary depending on the network adapter). On Intel network cards, this option may be called PME (Power Management Event);
- You can use PowerShell to check that the WakeOnLan option is enabled in the settings for your network adapter:
Get-NetAdapter -Physical | Get-NetAdapterAdvancedProperty | where {($_.DisplayName -like '*WOL*') -or ($_.DisplayName -like '*Wake*')}
To enable WOL for a NIC, run (Depends on driver and NIC vendor):Get-NetAdapter -Physical | Set-NetAdapterPowerManagement -WakeOnMagicPacket Enabled -WakeOnPattern Enabled - Then go to the Power Management tab and allow the network adapter to wake the computer from sleep mode. Enable the Allow this device to wake the computer and Only allow a magic packet to wake the computer options.
powercfg /deviceenablewake "Realtek PCIe GbE Family Controller"Use the following command to check which devices can wake your computer:
powercfg /devicequery wake_armed
The Realtek PCIe network card can wake the computer from sleep in this case.
You will now be able to send a WoL packet to turn on your computer remotely from another device on the same LAN. Magic Packet contains the hardware address of the network card (MAC address) of the computer you want to turn on. You can find out the MAC address of your NIC from the ipconfig /all command output, or by using PowerShell:
Get-NetAdapter -Physical
Let’s generate and send a WOL magic broadcast packet using a simple PowerShell script. In the following script, specify the MAC address of the device you want to wake up:
$Mac = "08:99:02:b6:25:2a"$MacByteArray = $Mac -split "[:-]" | ForEach-Object { [Byte] "0x$_"}
[Byte[]] $MagicPacket = (,0xFF * 6) + ($MacByteArray * 16)
$UdpClient = New-Object System.Net.Sockets.UdpClient
$UdpClient.Connect(([System.Net.IPAddress]::Broadcast),7)
$UdpClient.Send($MagicPacket,$MagicPacket.Length)
$UdpClient.Close()
If configured correctly, the remote computer should wake up.
To use WOL in segmented networks or networks divided into VLANs, you must enable the forwarding of WoL broadcast packets (UDP port 9) at the network L3 switch or router level.
To remotely awaken computers, the free Windows tool WakeMeOnLan offered by NirSoft can be utilized. This utility lets you survey your LAN and detect all possible devices, or you can manually insert devices you want to activate remotely using WakeOnLan.
WakeMeOnLan includes command line mode. Launch the command below to awaken the remote device via its IP address. The tool will automatically link the IP address to the MAC per the arp table:
WakeMeOnLan.exe /wakeup 192.168.13.115
Or enter its MAC address:
WakeMeOnLan.exe /wakeup 04-7C-16-DA-CA-63
You can also use WoL tools on smartphones. For example, Wake On LAN for Android. To start your computer remotely, connect to the same LAN via a Wi-Fi hotspot (access point).
Run powercfg.cpl and navigate Choose what the power buttons do -> Change settings that are currently unavailable -> uncheck the option Turn on fast startup (recommended).
As a content writer, I’m unable to rewrite the HMTL code that you’ve provided. This segment contains JavaScript scripts and ad-related coding, neither of which are story narratives. Please provide a narrative that includes story details, dialogue, or events that can be rewritten.