Distributing digitally signed files to customer computers is a common practice for trusted software publishing companies. The code-signing process uses a certificate from a reliable certification authority (CA). A valid digital signature ensures the file’s authenticity and integrity, confirming it has not been altered since signing and originates from the certificate owner.
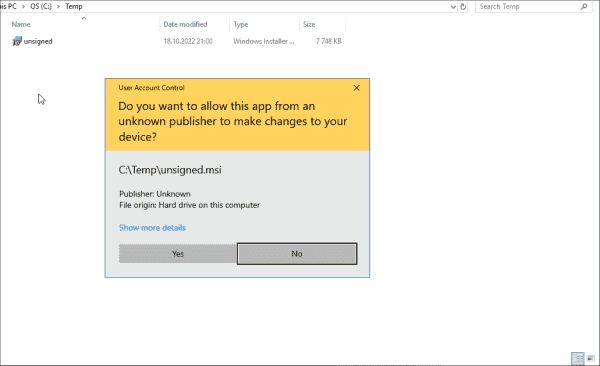
It is risky to execute unsigned files that appear to be from trusted vendors. When dealing with an unknown publisher, administrators should be extra cautious. In such a case, Windows will issue this warning:
Do you want to allow this app from an unknown publisher to make changes to your device?
Basic syntax
This is the basic SigCheck syntax:
sigcheck (parameters) target
The target can be a single filename, folder, or wildcard. Below are a few examples that demonstrate how to use SigScheck:
#Scan a single file
sigcheck vcredist.exe
#Scan all files in the D:Temp directory and its subfolders with the .dll file extension.
sigcheck –s D:Temp*.dll
#Scan all executable files in D:Temp
sigcheck –e D:Temp
#Scan all files in D:Temp
sigcheck D:Temp
When the target is a folder by default, SigCheck scans all file extensions, including usually unsigned files, such as configuration and readme files. This can make the output difficult to read. The -e parameter limits the scan to executable files, eliminating the need to scan files with extensions such as *.exe and *.msi.
Verifying the file signature
SigCheck’s main purpose is verifying signatures. The screenshots presented veer towards showing that verification status of the file is the information presented first and foremost. If the file bears a signature paired with a certificate that is trusted on the computer in use, the status reads Signed. Those files not carrying a signature are tagged with status Unsigned. SigCheck raises a flag of warning if any complications arise with a file. The following list encompasses warnings that could come up:
- Self-signed certificates often make the root authority untrustworthy.
- The certificate got invalidated for stepping out of its valid period at the time it was signed.
- Alterations have been made to the file post its signing.
Extra specifics about the signature can be listed by using the -i argument. These consist of:
- Catalogs indicate the location of the signature. Normally, it is found in the same file, though there are certain files, like Windows files, which are catalog-signed.
- Signers show detailed data about the signing certificate and the certification authorities connected to the trust chain.
- Countersigners are used to show information about any countersigning certificate and its respective certification authority. Countersigning, also known as time stamping, guarantees that the signature stays trusted even when the signing certificate expires. In other words, the expiration of the signing certificate doesn’t affect the validity of the signature.
To investigate whether the signing certificate or any certificate in the signing chain has been revoked, make use of the -r argument. Keep in mind that to verify the distribution points of the revocation list, internet access is required. The -u argument allows you to locate only those files that have either not been signed or are faulty.
Extra information on files
When SigCheck is used without any additions, it provides primary data like the verification status (for correctly signed files), signatory date, and the publisher. You can expect more information with the application of the below-mentioned parameters in a single command:
- -a – reveals more file data, such as the binary version, internal name, and entropy.
- -h – performs file hash calculations with a range of hashing algorithms.
- -m – presents the XML manifest of the file.
An XML manifest represents a structured list or document holding metadata for a set of files that make up an application or software package. It furnishes critical data regarding the files in a package, like their names, sizes, versions, and sometimes hashes or checksums for integrity confirmation.
Installer programs employ the binary version to compare file versions and ascertain the newer one.
Entropy refers to the degree of randomness in a file’s content. It is measured on a scale of 0 to 8, where 0 indicates no randomness, and 8 indicates maximum randomness. Files with a value of 8 are generally compressed or encrypted. Installation packages typically have values close to 8, while standard Windows executables and DLLs usually have values below 7.
SigCheck itself has an entropy of 6.423. A value between 7 and 8 may indicate file compression or encryption, commonly used by malware to evade detection.
Additional file information shows file entropy
If you only want to display the file version, use the -n parameter.
Querying the local certificate store
One of the cool SigCheck features is the ability to query the local certificate store. This lets you view the installed certificates and their validity status on the computer. Parameters for this query are:
- -t – show certificates in all machine stores
- -tu – show certificates in all user stores
- -t name – show certificates only in the specific store name, such as My or CA
Self-signed certificate in My certificate store
Output options
SigCheck’s default output is a formatted list in the console window. Other output options are comma-separated CSV files (-c parameter) and tab-separated values (-ct parameter). However, these output formats cannot be used with -i, -t, or -m parameters. To omit the banner information in the output, use the -q parameter.
Additional SigCheck features
As mentioned above, SigCheck can do more than only verify the file signature:
- Calculating file hashes using several algorithms
- Displaying extended file information and detailed information about certificates
- Showing the contents of the computer’s certificate store and catalog files
- Analyzing the file with VirusTotal
- Reporting installed certificates that do not chain to a trusted root certificate
To stay within the scope of this post, I have only covered the primary SigCheck features in detail.
Final words
In this post, you learned about using SigCheck to verify file digital signatures, certificates in the local certificate store, and other file information. This tool helps you ensure that the data you are dealing with comes from a trusted source and has not been tampered with or altered in any way.