A provisioner is a method with which a system proves its identity to the CA. This could be done with OAuth, JWT, or hardware attestation (e.g., Apple Security Chip, Yubikey, or TPM).
I use the standardized ACME protocol since it is very popular and supports most operating systems and appliances.
This article will guide you through the installation and configuration process of step-ca on Linux. We will enable step-ca to use the ACME protocol so your systems can automatically request and renew certificates.
Installing step-ca
For this guide, I am using Ubuntu Linux 22.04 LTS. Step-ca is cross-platform. Installation instructions are available for all major operating systems and various Linux distributions. I will install the system on a dedicated virtual machine with a ca.mydomain.int hostname. A functional DNS infrastructure is required when provisioning TLS certificates for internal domains. Certificates are created for a host’s DNS name(s), which ACME uses to verify the client. You will have to adapt these instructions to follow your own DNS structure.
We will update everything to the latest version, download the package with wget and install the step-ca server.
sudo apt -y updatesudo apt -y upgrade
sudo apt -y install wget
wget https://dl.smallstep.com/certificates/docs-ca-install/latest/step-ca_amd64.deb
sudo dpkg -i step-ca_amd64.deb
This will install the step-ca binary in /usr/bin/step-ca and is only necessary for the server portion. Clients will not need this package. In addition, we will install the Step CLI on the server to allow for server configuration.
wget https://dl.smallstep.com/cli/docs-ca-install/latest/step-cli amd64.debsudo dpkg -i step-cli amd64.deb
The step-cli simplifies managing and verifying the CA you will publish. Additionally, we will use an ACME client in the following steps to request a client certificate. The client is cross-platform. Instructions and builds for many operating systems and processor architectures are here.
Initializing step-ca
With the command below, we initialize a certificate authority with the Step CLI:
step ca init
If you are replacing or augmenting an existing PKI (Public Key Infrastructure), you can pass an existing root certificate and private key. Additional options for cloud infrastructure (e.g., Amazon or Azure Key Management System) are also available.
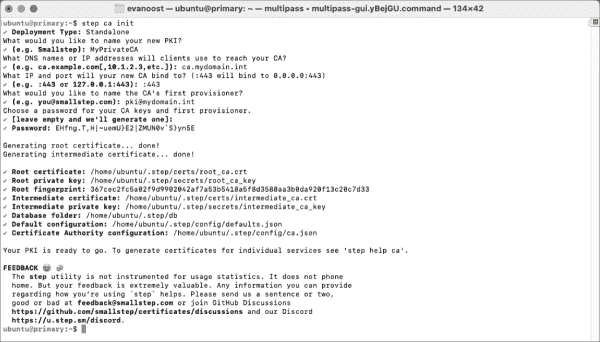
For this guide, I will be setting up the CA with the following settings:
- Deployment Type: Standalone – Cloud and monitoring options are available but may incur a cost for more extensive deployments.
- PKI Name: MyPrivateCA – For larger deployments, you should make this name descriptive to distinguish between test, dev, and production environments.
- DNS names or IP addresses: ca.mydomain.int – These DNS names and IP addresses will be included in the CA certificate. Add your own DNS names and IP addresses here.
- IP and port to bind to 443 – This will bind to all IPs on port 443. If you proxy the app using Nginx or a load balancer, you can bind to the internal IP 127.0.0.1 and/or use another port.
- First provisioner: [email protected] – This is the equivalent of the superuser or root user of the PKI server. mydomain.int is built on my personal DNS infrastructure. Please adjust it according to your requirements.
- Password: Leave empty – This will auto-generate a password, which you should safeguard.
Once you have completed the initialization, we can add ACME provisioner support and start (or restart) the certificate authority.
step ca provisioner add acme --type ACME
Next, we will ensure that we can operate the step-ca server as an ordinary user (not as root) and initialize the server:
sudo setcap CAP_NET_BIND_SERVICE=+eip $(which step-ca)step-ca
It will request the random password we created earlier to unlock the root keys. The output should resemble the following:
2023/12/19 09:25:44 Starting Smallstep CA/0.25.2 (linux/arm64)…
2023/12/19 09:25:44 X.509 Root Fingerprint: …
2023/12/19 09:25:44 Serving HTTPS on :443 ...
Your Certificate Authority is now operational.
Should you not acquire the final statement, there could be an inhibitor disrupting the application provision on port 443. Execute CTRL+C to terminate the program and scrutinize the log messages to comprehend the inability for binding. These messages ought to be evident on the terminal output by now. For Linux users, typically, the common users are not granted permission to operate on ports beneath 1024. Consequently, to tackle this issue, one can either employ the setcap command or initiate the application as root through the usage of sudo or Docker encapsulation.
Occasionally, you may already possess a web server functioning on the same port. In case SELinux is activated, the step-ca application has to be authorized to operate on a privilege port. During the setup process or within the configuration file, allocate an alternative port (for instance, 8443) and utilize your current web server configuration in the form of a proxy.
Upon ensuring all aspects are functioning optimally, a working PKI system should be within your possession! Booting up the CA would necessitate your password for certificate decryption. Storing this password safely in a vault or a TPM chip would be ideal. Remember, violation of the root key can result in the compromise of your entire PKI.
Starting your PKI automatically when your system reboots:
At this stage, a service is running on port 443. But manually starting it every time the server reboots is not efficient. End the step-ca process by pressing CTRL+C in the terminal. It’s better to run services like this under a restricted service account:
sudo useradd --system --home /etc/step-ca --shell /bin/false step
Should your CA be bound to a port number below 1024, the step-ca binary should have low port-binding capabilities:
sudo setcap CAP_NET_BIND_SERVICE=+eip $(which step-ca)
Create and move your CA configuration into the step user home directory:
sudo mkdir /etc/step-casudo mv $(step path)/* /etc/step-ca
Put your PKI password in /etc/step-ca/password.txt so that it can be read upon server startup. You can do this using an editor like vi or nano. Note that you will have to edit these files as root, so make sure that you specify sudo vi or sudo nano to edit those files. Ideally, you’ll have this key stored in a TPM2, YubiKey, or other protected system. However, this is outside the scope of this tutorial.
Edit the file /etc/step-ca/config/defaults.json and /etc/step-ca/config/ca.json to reflect the new path. In this scenario, various keys in the configuration needed to be switched from /home/ubuntu/.step to /etc/step-ca. This can be easily accomplished using your editor’s find and replace functionality.
Assign the step user as the owner of your CA configuration directory:
sudo chown -R step:step /etc/step-ca
Utilize your preferred editor to create a systemd unit file. You can use either vi or nano:
sudo nano /etc/systemd/system/step-ca.service
Add the following contents:
[Unit]
Description=step-ca service
Documentation=https://smallstep.com/docs/step-ca
Documentation=https://smallstep.com/docs/step-ca/certificate-authority-server-production
After=network-online.target
Wants=network-online.target
StartLimitIntervalSec=30
StartLimitBurst=3
ConditionFileNotEmpty=/etc/step-ca/config/ca.json
ConditionFileNotEmpty=/etc/step-ca/password.txt
[Service]
Type=simple
User=step
Group=step
Environment=STEPPATH=/etc/step-ca
WorkingDirectory=/etc/step-ca
ExecStart=/usr/bin/step-ca config/ca.json --password-file password.txt
ExecReload=/bin/kill --signal HUP $MAINPID
Restart=on-failure
RestartSec=5
TimeoutStopSec=30
StartLimitInterval=30
StartLimitBurst=3
; Process capabilities & privileges
AmbientCapabilities=CAP_NET_BIND_SERVICE
CapabilityBoundingSet=CAP_NET_BIND_SERVICE
SecureBits=keep-caps
NoNewPrivileges=yes
; Sandboxing
ProtectSystem=full
ProtectHome=true
RestrictNamespaces=true
RestrictAddressFamilies=AF_UNIX AF_INET AF_INET6
PrivateTmp=true
PrivateDevices=true
ProtectClock=true
ProtectControlGroups=true
ProtectKernelTunables=true
ProtectKernelLogs=true
ProtectKernelModules=true
LockPersonality=true
RestrictSUIDSGID=true
RemoveIPC=true
RestrictRealtime=true
SystemCallFilter=@system-service
SystemCallArchitectures=native
MemoryDenyWriteExecute=true
ReadWriteDirectories=/etc/step-ca/db
[Install]
WantedBy=multi-user.target
This file is also hosted on GitHub.
Here are some notes on the properties in this file built to sandbox the application:
- User and Group cause step-ca to run as the service user we created earlier.
- The usage of AmbientCapabilities and CapabilityBoundingSet is to restrict the range of capabilities that a process can acquire. In this case, we can only bind to ports that are less than 1024, as discussed earlier.
- SecureBits allows the service to keep its capabilities even after switching to the step user. NoNewPrivileges ensures that once the process is started, it cannot elevate itself to gain new privileges.
- ProtectSystem, ProtectHome, and RestrictNamespaces sandbox the process.
- RestrictAddressFamilies prevents the service from allocating non-IP or non-Unix sockets.
- PrivateTmp and PrivateDevices give the service a private temporary files directory and access to a private set of key pseudo-devices (e.g., the random number generator) but no access to real hardware.
- The Protect* stanzas limit access to system resources, so the process cannot change them.
- LockPersonality ensures that a process cannot switch personalities after being launched. This includes turning off ASMR support and virtual memory capabilities or switching from 64-bit to 32-bit mode, which could indicate a compromise.
- RestrictSUIDSGID restricts setuid/setgid file creation (files that run as root).
- RemoveIPC removes all inter-process communication objects the service creates when it is stopped.
- RestrictRealtime restricts real-time scheduling access.
- SystemCallFilter and SystemCallArchitectures define the list of system calls the service can use.
- MemoryDenyWriteExecute prevents the service from creating writable-executable memory mappings.
- ReadWriteDirectories ensures that the process can write to its state directory.
Now we need to make sure the system picks up the change, then enable and start the step-ca process, this will also enable it to start upon boot of your Linux system:
sudo systemctl daemon-reloadsudo systemctl enable --now step-ca
sudo systemctl status step-ca
The status command should return Active: active (running) and a portion of the output of the step-ca process. If there is an error, or you want to review the logs, you can use the following commands to review the logs and restart step-ca respectively:
sudo journalctl -u step-casudo systemctl restart step-ca
From now on, if you want to configure your step-ca server in this new location, make sure to set the path to the configuration as an environment variable:
export STEPPATH=/etc/step-ca
You can now verify that it is in the /etc/step-ca location: