This article outlines the process for manually loading and initializing network adapter drivers in Windows PE (Preinstallation Environment) or WinRE (Recovery Environment). These environments are crucial for installing, maintaining, and repairing Windows, as they utilize a streamlined, bootable version of Windows.
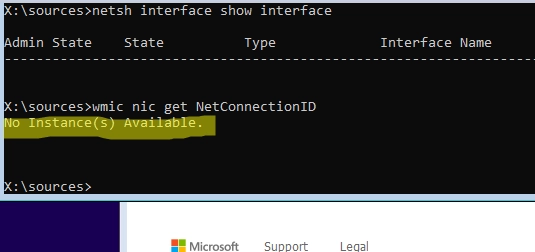
When booted into WinPE or WinRE, specialized network adapter drivers may not be included, which can restrict network access. If you boot into WinPE and discover that the network adapters are not recognized (the command netsh interface show interface returns no results), it indicates that the necessary drivers are either missing or not detected by the environment.
Verify Network Adapter Presence
To confirm whether network adapters are present, use the WbemTest tool. Connect to rootcimv2 and run the following WMI query:
select * from Win32_PNPEntity where (description like '%ether%') or (description like '%network%')This helps identify your network adapter’s vendor and device IDs. For instance, an adapter with vendor ID 8086 and device ID 10D3 corresponds to the "Intel 82574L Gigabit Network Connection".
Next, download the appropriate drivers from the vendor’s site and extract them to a USB drive. The drivers must include INF, CAT, and SYS files.
Load the Network Driver
Insert the USB drive and use this command to identify the assigned drive letter:
wmic logicaldisk get caption, deviceid, descriptionNow, load the driver using the drvload command:
drvload e:driverse1d.infAfter loading, verify it was successful by running:
pnputil /enum-driversInitialize Networking
After the driver is loaded, initialize the network with:
wpeinitTo check if the network interface is available, execute:
netsh interface show interfaceIf successful, a new network adapter will be detected.
Configure IP Address
For DHCP users, the adapter is usually configured to obtain an IP address automatically. You can check with:
netsh int ip show confTo set a static IP address, use:
netsh int ip set address Ethernet0 static 192.168.18.123 255.255.255.0 192.168.18.2netsh int ipv4 add dnsserver name=Ethernet0 addr=192.168.18.2 index=1To revert to DHCP, run:
netsh interface ipv4 set address Ethernet0 source=dhcpwpeinitMap Network Shares
To map a network share, use:
net use I: \192.168.39.91ISONote that starting from Windows 10 version 1709, the SMBv1 protocol is disabled in WinPE and can only be enabled by modifying the boot.wim image.
Disable the Firewall
The WinPE environment has a firewall enabled by default. To ensure remote access is allowed, disable it with:
wpeutil disablefirewallFor remote access, reset the built-in Administrator password:
net user administrator *Backup and Restore
With network functionality enabled, you can use commands like wbadmin get versions -backuptarget:\<server><share> to manage system backups over the network.
By following these steps, you can efficiently set up networking in the Windows PE environment, allowing access to network resources and facilitating tasks such as updating antivirus definitions or installing Windows across non-PXE supporting computers.