Caution: It’s advisable to initially experiment with a device where data loss isn’t a concern, like a USB drive or virtual machine, prior to applying it in an operational setting. Altering partitions or encryption configurations can lead to unrecoverable data dissolution, so ensure the existence of functional backups.
Understanding logical volume management (LVM)
LVM is a sound storage management framework offering a variety of handy features, such as volume alterations, snapshots, and data protection elements like RAID and encryption. It eases the storage management of Linux systems by transforming physical storage devices into logical volumes.
The following elements are important to understanding the encryption of LVMS:
- Logical volumes: These are virtual divisions made from the storage pool available in the LVM. They operate like traditional disk partitions but are more flexible. Unlike regular partitions, logical volumes can span across multiple physical disks and can be resized (either expanded or reduced) without having to unmount the filesystem or cause downtime.
- Volume groups: These are the environments within which logical volumes are created, often referred to as a VG. One or more physical volumes (such as a disk, a LUN, or a partition) can be included in a VG. The VG can be set up to provide redundancy (permitting various types of software RAID).
- Linux Unified Key Setup (LUKS): This is a specification for disk encryption. Although it’s not unique to LVM, it can manage encryption on any disk type. In this post, we’ll be setting up “LUKS on LVM,” which simply means encrypting at the logical volume level. As a result, the encrypted LV is visible to the system but can only be accessed with a key, which is beneficial if you want a per-user volume, such as encrypted home directories. Another option is “LVM on LUKS,” which implies that the entire block device is encrypted with LUKS first, and then LVM is placed on top after unlocking.
Installation of Cockpit and Its Storage Plugins
For most distributions, both LUKS and LVM support is integrated into the kernel, with the necessary tools included as part of the base packages. This means no additional software is needed. However, I will be using tools to aid in the configuration of these systems through a web-based GUI called Cockpit. By default, Cockpit, LVM2, and the Trusted Platform Module (TPM) 2.0 tools are included with Red Hat Enterprise Linux but may need to be installed on Ubuntu or other distributions.
To install Cockpit, the storage plugin for Cockpit, and the LVM2 plugin for udisks2 on a Debian-style system, do this as an administrative user:
sudo apt install cockpit cockpit-storaged udisks2-lvm2
Udisks2 provides an application interface for storage-related operations, such as formatting, detaching, or notifying apps about disk changes.
Once Cockpit is installed, it should be reachable at your Linux machine’s IP address on port 9090 (if you’re on the same machine, it’s https://localhost:9090/). You may have to open a firewall, depending on your setup. Note that your browser will give a warning, as the SSL certificate is self-signed. Log in using any account with admin privileges.
Cockpit login screen for Ubuntu
Creating an LVM configuration on a blank disk
If you want to use a volume group that is already installed, you may skip the first few steps. I will create a simple LVM setup on an empty (attached) disk using Cockpit. After logging in to Cockpit, click Turn on administrative access and type in your account password.
Go to the Storage tab, and then on the right-hand side, you should see Devices and Drives. Drives represents the physical hardware, and Devices represents the virtual block systems, which can be a software RAID volume, or in my case, the boot drive’s LVM2 Volume Group.
For the purposes of this article, I have added a second drive that is just 25 GB, since I don’t want to modify my boot system. Make sure to use the correct drive for your use case and that the drive is empty. Click the disk to see and delete any existing data partitions.
Alternatively, use the command line wipefs -a /dev/vdb which will wipe the vdb device entirely (find the correct name for your device in the Cockpit interface). Once you have a blank disk, click the blue button with the three lines (hamburger) in Devices. Note that it doesn’t need to be formatted, but you can do so and create regular partitions if necessary in the Drives interface.
Next, select Create LVM2 volume group.
Once selected, a form will pop up. You can give the volume group a name (default vgroup0 is fine) and select the disk/partition you want to use. If you have not created partitions, it will use the entire disk space for the volume group (VG). Once created, the VG will now be shown in the Devices list. Click it to open it.
If you wanted to perform LVM on (top of) LUKS, you would first format the partition or drive you want the LVM volume group to reside on using LUKS, unlock it, and then create the LVM volume group on top of that; however, in this case, we are going with LUKS (on top of) LVM, as this will be the basis for our full-disk encryption configuration in a future article.
Subsequently, we will add a logical volume (LV) in much the same way: click the button and give it a name. As indicated above, a volume group (VG) can span multiple devices and provision block devices (like regular fixed partitions) or become a pool for thin-provisioned volumes. A VG can have multiple LVs, so you can mix them according to your needs (e.g., reserve a volume of space for the operating system in one LV and later add a thin provisioning pool for VMs).
Creating a logical volume
In this post, we will focus on creating a thin volume. Logcal Volumes (LVs) can have properties like Grow. If you expand the base volume group (either by adding more disks or allocating more storage to a VM or cloud server), or if you don’t utilize all the space while generating your LV, you may magnify it anytime (given that there is space left).
Creating a thin volume
Having created a few volumes, you’ll notice the availability of several other functionalities, such as snapshots, expansion, and reduction. It’s possible you’ll observe that each of the LVs also appears as a block device. Meaning, if raw storage device is what you need, you may direct your application to /dev/vgroup0/lvol1, lvol2, and so on.
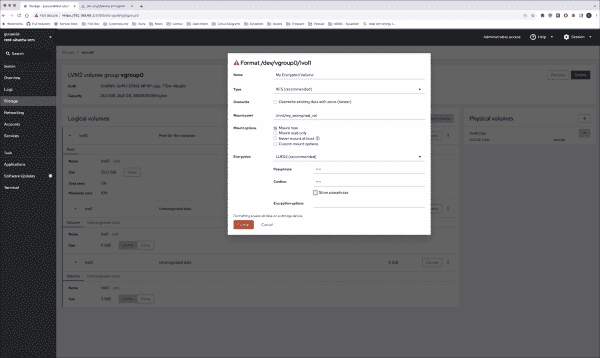
One of our objectives is to have an unformatted volume available as a formatted and encrypted LUKS partition. We want this partition to have its data at mount point /mnt/my_encrypted_vol (LUKS on LVM).
Formatting a disk with encryption
So, I click on the Format button, provide a name, specify the mount point and filesystem type plus a passphrase for my encrypted area. You might prefer to choose Never mount at boot as the system is unaware of your passphrase and cannot proceed to mount the disk until you input a passphrase manually. Yet, if any of your apps (e.g., a database) rely on this data, you’d have to mount it at boot time, which means an administrator would be needed each time the system restarts.
In future articles, we’ll delve into key management, multiple keys, and TPM2. For the time being, I’ll have to manually mount the file system either when I unmount it or during reboot by using my passphrase and pressing the Mount button.