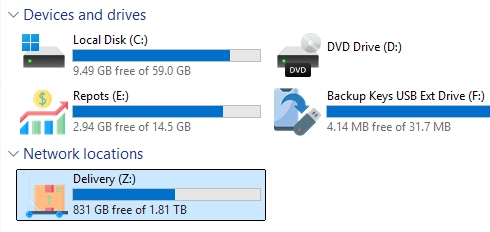
Customizing drive icons in Windows can enhance navigation and provide a personalized touch to your system. By default, Windows Explorer displays standard icons for local, removable, and mapped network drives. However, you can assign custom icons to make the experience more intuitive. Here’s how to set custom drive icons for various drive types, including steps for both manual configurations and centralized assignments in a network through Active Directory Group Policy.
Methods to Set Custom Drive Icons
You can configure custom drive icons using two primary methods:
- Using the
autorun.inffile: This method is particularly useful for removable drives. - Via the Windows Registry: This method can be applied to all users or to specific users.
Preparing Your Icons
Before setting custom icons, prepare your icon files. Use ICO files that contain multiple resolutions (such as 16x16, 32x32, 48x48, and up to 512x512) to ensure proper scaling in Windows Explorer. You can create your files or find them online. An online service that may be helpful is Redketchup.
Assigning Icons via the Registry
To assign a custom icon to a drive using the registry, follow these steps:
- Copy ICO files: Place your custom .ico files in the
%public%Picturesdirectory. - Open Registry Editor: Navigate to
HKLMSOFTWAREMicrosoftWindowsCurrentVersionExplorerDriveIcons. - Create a subkey with the drive letter you wish to customize (e.g., create the subkey for drive Z).
- Create a DefaultIcon subkey under this new key.
- Set the Default value to the path of your ICO file (e.g.,
%PUBLIC%Picturesreports.ico).
After making these changes, refresh File Explorer to see the new icon.
Quickly Set Icon via Command Prompt
You can also use the command prompt to assign a custom icon:
reg add "HKLMSOFTWAREMicrosoftWindowsCurrentVersionExplorerDriveIconsZDefaultIcon" /ve /d "%PUBLIC%Picturesreports.ico" /fChanging Drive Descriptions
In addition to changing the icon, you can also modify the display name of local drives:
reg add "HKEY_LOCAL_MACHINESOFTWAREMicrosoftWindowsCurrentVersionExplorerDriveIconsZDefaultLabel" /ve /d "My Custom Drive" /fFor network drives, the registry path will differ slightly, as it involves the user hive:
HKEY_CURRENT_USERSoftwareMicrosoftWindowsCurrentVersionExplorerMountPoints2##FS01#DOCS]"_LabelFromReg"="Public DOCS"Using autorun.inf for Removable Drives
To change the icon for a USB drive:
- Copy the icon file to the USB drive.
- Create an
autorun.inffile in the root directory of the drive:[autorun]label=Backup Keys USB Driveicon=backup.ico - Restart File Explorer to see your changes.
Centralized Icon Assignments via Group Policy
If you want to apply the same custom icons across multiple user machines:
-
Copy the ICO files to user machines via Group Policy. Navigate to:
- Computer Configuration -> Preferences -> Windows Settings -> Files
- Use the path
%SystemDrive%userspublicpicturesreports.ico.
-
Create registry items for each drive icon assignment in Group Policy:
- Navigate to:
SOFTWAREMicrosoftWindowsCurrentVersionExplorerDriveIconsZDefaultIcon. - Set the
Defaultvalue to%SystemDrive%userspublicPicturesreports.ico.
- Navigate to:
-
Update Group Policy settings on client machines to apply changes.
With these steps, you can personalize your drives effectively while ensuring consistency across your networked environment.