Install step-cli on a client.
Pre-built packages for many operating systems and CPU platforms are on the GitHub releases page.
You can also install the step-cli via Homebrew on Mac:
brew install step
For Intel-based Linux distributions (Debian):
wget https://dl.smallstep.com/cli/docs-cli-install/latest/step-cli_amd64.deb
sudo dpkg -i step-cli_amd64.deb
On Windows, you can Install step via Winget:
winget install Smallstep.step
After installing, you may need to restart your terminal for step to be in your path.
Using the step-cli client
You will need the root fingerprint printed by the output during setup to use the step client on your client systems. You can always retrieve this information using the step-cli on the CA server. If you followed my previous article:
export STEPPATH=/etc/step-ca
step certificate fingerprint $(step path)/certs/root_ca.crt
On the client, execute the next command to download the Root Certificate. Make sure to substitute your CA server’s DNS or IP address and fingerprint with the one you obtained from the previous command:
step ca bootstrap --ca-url https://<YOUR_CA_SERVER> --fingerprint <YOUR FINGERPRINT>
The above command will download the root certificate from your CA server and authenticate it using the fingerprint you specified. Upon successful verification, your step client will trust this CA, enabling you to perform tasks like certificate requests among others facilitated by the Step CA server. In scenarios where you have multiple CAs (for instance, in a development, testing, or production environment), you can assign a label to a CA in your configuration via the –context flag. An example would be to tag this CA as your “development” environment.
step ca bootstrap --ca-url https://<YOUR_CA_SERVER> --fingerprint <YOUR FINGERPRINT> --context dev
You will need to use the same context flag in future commands to specify the correct CA you wish to use at any point.
You should now receive a message with the location of the new root certificate on your system. You can now use this root certificate independently from the step client to import it in a browser, an application, or a system trust store, or push it to Active Directory clients using Windows Group Policy.
Installing the root CA in trust store(s)
The step client provides a convenient tool to install the certificate in your system, Firefox, and Java trust stores. For me, my macOS’s step-cli client downloaded the cert to /Users/myusername/.step/certs/root_ca.crt, thus I can proceed with:
step certificate install --all ~/.step/certs/root_ca.crt
The ‘~’ symbol is a shortcut representing the current user’s home directory on Unix-like systems. Your user must have admin privileges, and you may need to input your user password; on MacOS, I also had to verify myself using TouchID.
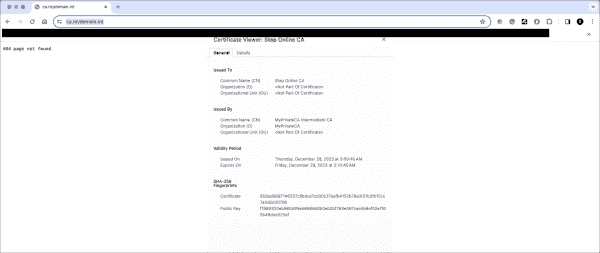
It might be required to restart your system, browser(s), and other applications that use the trust store. To check if it worked, access the CA’s URL you previously mentioned in the bootstrap command using a browser, assuming you used its Fully Qualified Domain Name (FQDN) instead of an IP address. You shouldn’t see any certificate warnings; you’ll encounter a 404 page not found. Inspecting the certificate will reveal the details you input while setting up the CA (see my previous article).
Whether your browser utilizes the trust store system hinges on the browser type. Google Chrome and Microsoft Edge utilize it by default, Firefox and its derivatives don’t by default. You ought to review your client’s browser documentation to figure out how to handle your root CA certificates. Applications and programming languages such as Java and Python might have their own trust stores, either on a global or per-application basis, necessitating a review of the documentation for any internally used applications.
Signing a certificate
When it comes to requesting a certificate, we must authenticate the system and employ the same username and password created during the initialization stages (the same one used to launch the step-ca server, or, if you followed my prior article, it can be found in /etc/step-ca/password.txt) to ensure your host is authorized to receive a TLS certificate.
TOKEN=$(step ca token ubuntu.mydomain.int)
You will be asked for the provisioner, for which I enter [email protected]; once again, this depends on your setup; review the previous article where I explain that I create [email protected] as the ‘admin’ or ‘root’ account for the step-ca server.
Then, we use the authorization token to request the CA to generate a certificate and save the certificate and a private key, which you can subsequently use on a web server. In this example, I am trying to get a certificate for “ubuntu.mydomain.int,” a host on the mydomain.int network, and store the private key and the signed certificate in my_host.key and my_host.crt respectively. Please modify this example according to your requirements.
step ca certificate --token $TOKEN ubuntu.mydomain.int my_host.crt my_host.key
Signing a certificate using a token
Now, I can insert the above key and certificate in my application’s configuration (e.g., the Nginx web server). Any client that trusts the root certificate will also trust this service now.
Automating certificate requests with ACME
We don’t want to put in a key manually every time. To automate this, the step client is also an Automatic Certificate Management Environment (ACME) protocol client. By default, ACME uses HTTP validation (also known as http-01). When you request a certificate, the CA server will attempt to connect to the hostname you requested for the certificate independently. If you request ubuntu.mydomain.int as in my example, your system must respond on port 80 at ubuntu.mydomain.int as seen from the CA server. Through an encryption challenge, the CA verifies that the certificate requestor controls the host. Other challenge methods may use DNS, TLS certificates, or EAB (External Account Binding) credentials, which can be augmented with multi-factor authentication and hardware attestation.
Using the http-01 HTTP validation for this case, the key and signed certificate will be deposited into test.key and test.crt respectively.
step ca certificate ubuntu.mydomain.int test.crt test.key --provisioner=acme
The system authenticates within a span of a few seconds, and consequently, a key and certificate are created. At this point, automation of the process is possible by running it in a Cron (or Cronicle) job to routinely secure new certificates.
For those familiar with Certbot from Let’s Encrypt, the same routine can be performed using the application. Essentially, Certbot should be informed about the private CA server and CA root key, which is achievable by utilizing the REQUESTS_CA_BUNDLE environment variable:
export REQUESTS_CA_BUNDLE=$(step path)/certs/root_ca.crt
sudo certbot certonly -n –standalone -d ubuntu.mydomain.int –server https://ca.mydomain.int/acme/acme/directory
Sudo is needed to listen on port 80 for the completion of the challenge. Recipes for integrating this with Nginx, Apache, or other web servers are widely available as the well-known Let’s Encrypt system also uses ACME. Many institutions have already set up public SSL certificates to be signed by an ACME-compliant client.
To verify and renew all of the certificates you’ve installed with certbot, this should again be integrated to run daily or weekly in a Cron job or Cronicle as root or another user who can renew your system’s certificates.
REQUESTS_CA_BUNDLE=$(step path)/certs/root_ca.crt certbot renew
Note that you should bootstrap the CA for the user that this command runs under so it can retrieve the correct path using the “step path” command (typically, this is ~/.step)