In this article, we’ll explore manual and automated methodologies to deploy extra language packs and configure the default language in Microsoft Office 2019, 2016, and Microsoft 365 Apps for Business (formerly known as Office 365).
In Microsoft Office, the language preferences can be adjusted in the following individual settings:
- Editing Language
- Display Language
- Help Language
- Proofing Tools – used for grammar and punctuation checks
How to Manually Install and Change Microsoft Office Language
If you already have Microsoft Office installed on your computer, you can manually download additional MS Office Language Packs and assign your preferred language.
- Open any MS Office application, such as Word, and check the app version and bitness (File -> Account -> About). In this example, it is a 32-bit version of Microsoft Office 2019 with an English UI;
- To install additional languages in Office, go to File -> Options -> Languages;
- Select the required language from the Add additional editing languages list and click Add;
- Then open this link https://support.microsoft.com/en-us/office/language-accessory-pack-for-microsoft-365-82ee1236-0f9a-45ee-9c72-05b026ee809f. Choose your version of Office, the language you want to add, and download the language pack (32 or 64 bit);
- Run the OfficeSetup.exe file that you downloaded. The installation runs in the background. The installer will download and install the language pack files from the Microsoft CDN;
- When the language pack installation is complete, set the default display language in your Office app settings;
- Restart Word and check that the interface language has changed.
If you need to use the automation tools (SCCM, Intune, scripts, GPO) to manage language packs and MS Office settings on multiple computers, the manual method is not suitable.
To find out which Office language packs are installed on your computer, use PowerShell to check the following registry parameters.
List installed language packs:
Get-Item "HKCU:SOFTWAREMicrosoftOffice16.0CommonLanguageResourcesEnabledEditingLanguages"
Discover the Office interface language set up in the current user profile:
(Get-ItemProperty HKCU:SOFTWAREMicrosoftOffice16.0CommonLanguageResources).UILanguageTag
Deploy Additional Language Packs with Office Deployment Tool (ODT)
For Microsoft Office 2021/2019/2016 and Office 365 versions that are distributed using C2R packages, the Office Deployment Tool (ODT) can be utilised for automating the installation of additional language packs.
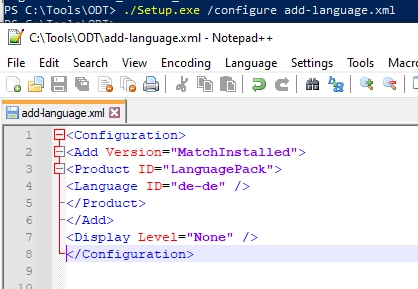
Download the ODT and extract it to a local drive. Create an add-language.xml file with the following configuration:
<Configuration><Add Version="MatchInstalled">
<Product ID="LanguagePack">
<Language ID="de-de" />
</Product>
</Add>
<Display Level="None" />
</Configuration>
Add Version="MatchInstalled"– This implies that modifications should be applied to any version of Office installed on your computer, regardless of whether it’s Office 2019 or 365.Language ID="de-de"– This signifies the language pack to be installed. Multiple language packs can be indicated in this manner:<Language ID="fr-fr" /><Language ID="de-de" />
- To install the language pack that is compatible with the default language of your Windows interface, modify the input to:
<Language ID="MatchInstalled" />
For more details about how to set up and handle language packs in Windows, you can read more here.
Following these steps, navigate to the directory containing ODT and implement the command:
Setup.exe /configure add-language.xml
ODT will download and install the specified language pack (German in this example) for your version of MS Office.
For more information, see How to install specific Microsoft Office applications.
If you need to remove one of the installed language packs, use the XML file:
<Configuration><Remove>
<Product ID="LanguagePack">
<Language ID="de-de" />
</Product>
</Remove>
</Configuration>
Change Language Settings for MS Office with GPO
You can then use Group Policy to set a default language for MS Office users..
- Download and copy the administrative GPO template files for Microsoft Office to the GPO Central store in the Active Directory domain;
- Then create a GPO and link it to the target OU with users using the domain GPO Management console (gpmc.msc);
- Go to User Configuration -> Policies -> Administrative Templates -> Microsoft Office 2016 -> Language Preferences. Go to the Display Language section and set the default language for the MS Office user interface in the Display menus and dialog boxes in parameter;
- Then set the default input language in the Editing Languages section (Primary Editing Language);
- After updating the client GPO settings, check that the default MS Office interface changes to the language you have set. Note that the current interface and editing language are set by policy.
In Microsoft 365, you can assign a user’s language preferences using the command:
Get-MsolUser -UserPrincipalName maxbak | Set-MsolUser -PreferredLanguage "de-DE"
If a user is synced to Microsoft 365 from an on-premises Active Directory, you can assign a language to the user by using the preferredLanguage attribute:
Get-ADUser maxbak -Properties PreferredLanguage | Set-ADUser -Replace @{PreferredLanguage = "de-DE"}