On Windows, the integrated Task Scheduler enables users to trigger actions based on schedules or specific events. This guide details the steps to set up a PowerShell script so that it runs automatically via the Windows Task Scheduler. The PS1 script will execute discreetly in the background, free from any pop-ups, and it operates independently of the current PowerShell script execution policy settings.
For this instance, I will configure the C:PSOutlook_Email_to.ps1 PowerShell script to run every 10 minutes.
- Launch the Task Scheduler console using the command
taskschd.msc. - Expand the Task Scheduler library tree and create a dedicated folder for your personal scheduled tasks for easier management. Right-click and choose Create Task.
- Under the General tab, enter a name for the task and specify the user context in which it will operate. The task can be set to run:
Run only when the user is logged inRun whether the user is logged on or not- In the Triggers tab, set the event or timing for when the task should start. For instance, to initiate a task when a user logs in, select the At log on trigger and configure it to run every 10 minutes under the Repeat task every option.
- For tasks running as SYSTEM or a user with stored passwords, opt to execute the task upon system startup (At startup) and establish a regular restart schedule.
- You can also select the On a schedule trigger to specify precise start times. It’s possible to create multiple triggers for one task. Additionally, the scheduler can run a task triggered by specific events logged in the Event Viewer (refer to this guide for more details).
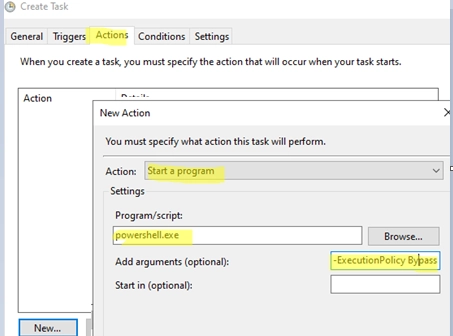
- Next, navigate to the Actions tab. Here, define the action that will execute upon the trigger event. In this scenario, I will select to run a PowerShell script. Choose New -> Start a program. Input the action details as follows:
- Program/script:
powershell.exe - Add arguments (optional):
-ExecutionPolicy Bypass -NonInteractive -WindowStyle Hidden -File "C:PSOutlook_Email_to.ps1" - The following parameters are employed to run a PowerShell script:
-File: Specifies the complete path to the script file (PS1).-ExecutionPolicy: Defines the execution policy for the current PowerShell session, ignoring current settings if Bypass is specified.-NonInteractive: Prevents any interactive prompts from appearing.-WindowStyle Hidden: Conceals the PowerShell window during execution (the console may briefly appear). This is applicable for scripts initiated from session 0 only.-NoProfile: Use this if the script can execute without accessing a user profile, which can speed up execution. - In the Settings tab, consider enabling options such as:
Allow task to be run on demand
If the running task does not end when requested, force it to stop
Do not start a new instance - Finally, save the task settings and ensure it appears in the Task Scheduler interface. Click on the task and select Run to test its functionality.
The latter option is commonly used. If you choose this, you may need to provide the credentials of a specific user (passwords can be securely stored using the Credentials Manager). If elevated permissions are necessary, select the Run with highest privileges option.
In environments with Active Directory, tasks can also be scheduled to run using gMSA managed service accounts.
Before launching the script via Task Scheduler, verify that it does not return any errors when run in unattended mode. Use the command:
powershell.exe -file C:PSOutlook_Email_to.ps1 -NoExit
If the PowerShell script executes successfully, the Last Run Result will show a confirmation message such as:
The operation completed successfully (0x0).
You can also create a scheduled task to execute a PowerShell script directly from the command line.
$TaskName="CheckOutlookMailbox"
 $Trigger = New-ScheduledTaskTrigger -AtStartup
 $Trigger.Repetition = (New-ScheduledTaskTrigger -once -at "12am" -RepetitionInterval (New-TimeSpan -Minutes 10) -RepetitionDuration (New-TimeSpan -Minutes 10)).repetition
 $User= "NT AUTHORITYSYSTEM"
 $Action= New-ScheduledTaskAction -Execute "PowerShell.exe" -Argument "-ExecutionPolicy Bypass -NonInteractive -WindowStyle Hidden -File C:PSOutlook_Email_to.ps1"
 Register-ScheduledTask -TaskName $TaskName -Trigger $Trigger -User $User -Action $Action -RunLevel Highest -Force
When executing PowerShell scripts via the Windows Task Scheduler, there are several important considerations:
- To execute the script in the PowerShell Core environment, use
pwsh.exerather thanpowershell.exe. - If other users have access to the machine where you are running the PowerShell script with elevated permissions, ensure you have modified the NTFS access permissions on the PS1 file to prevent them from altering it.
- If the task is executed as a user without administrative privileges, their account needs to be included in the local security policy Log on as a batch job (gpedit.msc -> Computer Configuration -> Windows Settings -> Security Settings -> Local Policies -> User Rights Assignment). A warning message will appear when setting up such a task:
This task requires that the user account specified has Log on as batch job rights
- In an Active Directory environment, the Group Policy Object (GPO) can be utilized to run PowerShell scripts during user logon or logoff, or when a computer starts up or shuts down. These scripts are referred to as logon scripts.
