Verify Kubernetes API supports RBAC
The first step is ensuring that RBAC is enabled in the Kubernetes API server. To do so, look at the –authorization-mode flag of the kube-apiserver YAML manifest.
sudo cat /etc/kubernetes/manifests/kube-apiserver.yaml | grep authorization-mode
You are good to go if you see RBAC listed as shown in the screenshot. Here, Node refers to node authorization mode, which authorizes API requests from kubelets, and RBAC denotes that RBAC is enabled. Once RBAC is enabled, it declares four object kinds in the Kubernetes cluster: Roles, RoleBinding, ClusterRoles, and ClusterRoleBinding. You can see these resources by running the kubectl api-resources | grep role command, as shown in the screenshot below:
This command returns each object’s API version and kind, as shown in the screenshot above. Notice that roles and rolebindings are namespaced, meaning they only apply to the resources within the same namespace in which they are created. The clusterroles and clusterrolebindings objects, on the other hand, are not namespaced, which means they work clusterwide regardless of the namespace. You will understand them better in the next section.
Understanding a role
In Kubernetes, a role defines a set of rules that specifies which operations are allowed on what resources. For instance, the role.yaml configuration file below creates a pod-reader role in the default namespace.
apiVersion: rbac.authorization.k8s.io/v1
kind: Role
metadata:
namespace: default
name: pod-reader
rules:
– apiGroups: [“”]
resources: [“pods”, “pods/log”]
verbs: [“get”, “watch”, “list”]
Viewing a role manifest in Kubernetes
Representation of a role manifest in Kubernetes.
The elements of a role manifest are:
- apiVersion – This denotes the API version where the role is applicable.
- kind – Specifies the kind of object, Role in this instance.
- metadata – Details describing the role, including name and namespace. A valid namespace must be mentioned; if ignored, the default namespace will be employed.
- rules – These are the regulations allowed by the role, with each having several subfields:
- apiGroups – Refers to the groups of APIs linked to the resources. The ” ” represents the primary API group encompassing resources like pods, services, nodes, etc.
- resources – Defines the resources to which the rules are applicable, including pods, services, and secrets.
- verbs – Enlists the verbs allowed under the rule, these may include: list, get, watch, create, update, delete.
Make note, the permissions not enlisted are implicitly denied, and the YAML file doesn’t allow the formulation of any denial rules.
Interpreting a role binding
In the previous section, we described a pod-reader role in the default namespace but didn’t associate it with any subject. The role will not do anything unless we bind it to a user, group, or service account. In Kubernetes, role binding associates a role with a subject to grant permissions defined in the role specification. The rolebinding.yaml file below binds a role with a group in the cluster.
apiVersion: rbac.authorization.k8s.io/v1
kind: RoleBinding
metadata:
name: read-pods
namespace: default
subjects:
– kind: Group
name: developer
apiGroup: rbac.authorization.k8s.io
roleRef:
kind: Role
name: pod-reader
apiGroup: rbac.authorization.k8s.io
- apiVersion—The API version of the role binding.
- kind—The object’s type, which is RoleBinding in this case.
- metadata—Data describing the role binding, such as its name and namespace. The namespace must match the one specified in the role.yaml file.
- subjects—A list of subjects, with the following subfields:
- kind—Specifies a User, Group, or ServiceAccount.
- name—Specifies the case-sensitive name of the user, group, or service account. In this case, the developer is the group name.
- apiGroup—Specifies the API group to which the role belongs. In our case, the developer group belongs to the rbac.authorization.k8s.io API group.
- roleRef—Specifies a role to which the binding refers. It has the following subfields:
- kind—Specifies the binding’s type, such as Role or ClusterRole.
- name—Specifies the name of the Role or ClusterRole to bind. In this case, we are defining a binding for the pod-reader role.
- apiGroup—Specifies the API group of the role to which the roleRef field refers. It must be rbac.authorization.k8s.io, because the Role and ClusterRole resources exist in this API group.
Keep in mind, the roleRef field is unchangeable, indicating it can’t be modified once the role binding is established. Alteration of this field calls for the deletion and re-establishment of the role binding object.
Cluster role and cluster role binding
Above-mentioned role and role binding are limited to the namespace in which they’re made. For instance, we put forth a pod-reader role in the default namespace and connected it with the developer group via a role binding. Consequently, only the developer group members can access Pods in the default namespace.
What if there’s a need to grant certain users (for example, security admins or auditors) the rights to access Pods in all namespaces (including the kube-system namespace)? Creating a separate role and role binding for every namespace isn’t efficient. Hence, cluster role and cluster role binding are introduced. They operate similarly to roles and bindings, but their scope expands to the whole cluster. Here’s a configuration that outlines a clusterrole.yaml file:
apiVersion: rbac.authorization.k8s.io/v1
kind: ClusterRole
metadata:
name: global-pod-reader
rules:
– apiGroups: [“”]
resources: [“pods”, “pods/log”]
verbs: [“get”, “watch”, “list”]
Viewing a cluster role manifest in Kubernetes
Here, the kind is set to ClusterRole, and the namespace is not specified because cluster roles work cluster-wide. Similarly, see the clusterrolebinding.yaml file below.
apiVersion: rbac.authorization.k8s.io/v1
kind: ClusterRoleBinding
metadata:
name: read-pods-global
subjects:
– kind: Group
name: security
apiGroup: rbac.authorization.k8s.io
roleRef:
kind: ClusterRole
name: global-pod-reader
apiGroup: rbac.authorization.k8s.io
Viewing a cluster role binding manifest in Kubernetes
Here, the subjects field specifies a group named security, and the roleRef field binds to the global-pod-reader cluster role defined in the clusterrole.yaml file. Once the cluster role and cluster role binding are created, they grant security group members access to Pods in all cluster namespaces.
Understanding the kubeconfig file
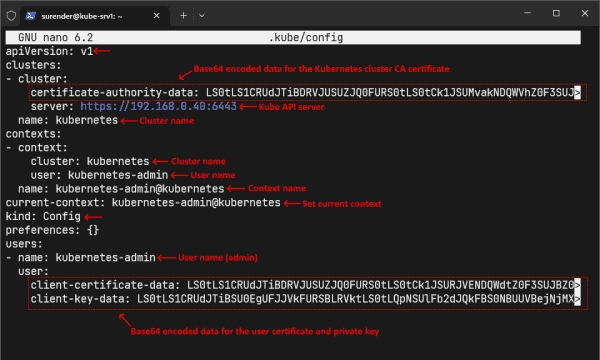
Now that you understand the roles and bindings, let me introduce you to the kubeconfig (kubernetes configuration) YAML file. Setting up a Kubernetes cluster with Kubeadm generates a kubeconfig file for the admin user on the control plane node at ~/.kube/config location. This file contains vital information to authenticate against the Kubernetes API.
Viewing the Kubernetes configuration (kubeconfig) file for the admin
As shown in the screenshot above, a kubeconfig file contains the following fields:
- Clusters—Contains a list of clusters that the user can access. Each cluster has a name, a server address, and base64-encoded certificate authority (CA) data.
- Users—Specifies a list of users who can authenticate to the clusters. Each user has a name, client certificate, and private key data in base64-encoded form.
- Contexts—Specifies a list of contexts. A context is a way of setting different cluster configurations and switching between them. It has a name, cluster name, user name, and a namespace.
- Current-context—This field defines the default context name for running kubectl commands.
You can share this kubeconfig file with other admins to give them full access to your Kubernetes cluster. However, you might want to grant more granular permissions on a production cluster to avoid potential issues.
Generate a kubeconfig file for a user
Kubernetes has no built-in user management functionality, so you must rely on external providers like AWS IAM or Keycloak for user management. For demo purposes in this post, I will create a regular Linux user on a Ubuntu VM and generate a kubeconfig file for that user.
First, connect to the VM, create a user account, and add it to the sudo group using the following commands:
sudo adduser john
sudo usermod -aG sudo john
Creating a user account and adding it to the sudo group in Ubuntu
Now log in with the new user account on the VM and generate a certificate signing request (CSR) and private key with the openssl command as shown below:
openssl req -new -newkey rsa:4096 -nodes -keyout john.key -out john.csr -subj "/CN=john/O=developer"
Generating a certificate signing request and private key with the openssl command
This command generates a new CSR file named john.csr and a private key named john.key in the home directory. The -subj parameter is essential here, as it defines the user’s common name and group membership. Remember the rolebinding.yaml file we created earlier, where we specified a developer group? Here, we declare the john user account a member of the developer group with the -subj option.
Now, you need to send the CSR file to your Kubernetes admin so that they can generate a certificate signed by the cluster certificate authority (CA).
That’s all we need to do on the Ubuntu VM for now. Let’s switch back to the control plane node.
Make sure you have the CSR file on the control plane node. I will use the scp command to copy the CSR file from the Ubuntu VM.
scp [email protected]:~/john.csr .
Copying the certificate signing request file to the control plane node
Next, use the CSR file to generate a certificate. To sign the certificate with the cluster CA, type the path of the CA certificate and private key, as shown in the command below:
sudo openssl x509 -req -in john.csr -CA /etc/kubernetes/pki/ca.crt -CAkey /etc/kubernetes/pki/ca.key -CAcreateserial -out john.crt -days 365
Generate a certificate signed by the cluster certificate authority
This command creates a certificate file named john.crt signed by the cluster CA.
Send this certificate file to the user account along with the Kube API server URL and CA certificate file (located at /etc/kubernetes/pki/ca.crt on the control plane node). I will use scp to copy both certificate files to the Ubuntu VM.
scp {john.crt,/etc/kubernetes/pki/ca.crt} [email protected]:~
Now, switch back to the Ubuntu VM, where you are already logged in with the John user account.
Ensure you have the certificate file and the CA certificate.
Ensuring that the certificate and private key files are handy
The next step is to install the kubectl tool on the VM. To do so, run these commands in the same order:
sudo apt install -y apt-transport-https ca-certificates curl
curl -fsSL https://pkgs.k8s.io/core:/stable:/v1.28/deb/Release.key | sudo gpg –dearmor -o /etc/apt/keyrings/kubernetes-apt-keyring.gpg
echo ‘deb [signed-by=/etc/apt/keyrings/kubernetes-apt-keyring.gpg] https://pkgs.k8s.io/core:/stable:/v1.28/deb/ /’ | sudo tee /etc/apt/sources.list.d/kubernetes.list
sudo apt update && sudo apt install -y kubectl
The kubectl tool aids in creating a kubeconfig file and establishes communication with the Kubernetes cluster.
After the installation of kubectl is complete, a kubeconfig file can be generated by executing the undermentioned kubectl config commands:
# Set cluster parameters in the kubeconfig file
kubectl config set-cluster kubernetes –certificate-authority=ca.crt –embed-certs=true –server=https://192.168.0.40:6443
# Establish user credentials in the kubeconfig file
kubectl config set-credentials john –client-certificate=john.crt –client-key=john.key –embed-certs=true
# Set context in the kubeconfig file
kubectl config set-context john@kubernetes –cluster=kubernetes –user=john –namespace=default
kubectl config set current-context john@kubernetes
Creating a kubeconfig file with the kubectl tool
The first command sets the cluster parameters, such as the cluster name (kubernetes), CA certificate (ca.crt), and Kube API server URL, in the kubeconfig file at the default location (i.e., ~/.kube/config). To specify an alternative location for the kubeconfig file, use the –kubeconfig parameter.
The second command sets the user credentials, specifying the user name (john), certificate (john.crt), and private key (john.key). The –embed-certs parameter stores the certificate data within the kubeconfig file in base64-encoded form, which makes the kubeconfig file portable. After running this command, you can delete the original john.crt and john.key files.
The third command defines the context by specifying the context name (john@kubernetes), cluster name (kubernetes), user name (john), and namespace (default).
The fourth command sets the default context for the kubectl tool. You can switch between contexts with the kubectl config use-context <context-name> command if there are multiple contexts in the kubeconfig file.
After running these commands, your kubeconfig file is ready.
Viewing the Kubernetes configuration (kubeconfig) file for the user
The screenshot shows that the kubeconfig file looks similar to the admin, except that the user is john, who can now successfully authenticate against the Kube API server.
At this point, if the user (john) tries to run the kubectl get pods command, he will get a “forbidden” error.
The error occurs due to the user being authenticated, but he is not yet authorized to perform any action on the cluster resources. The Kubernetes admin needs to assign permissions to the user. We created the configuration files for the role and role binding but haven’t applied them yet.
Create a role and role binding
To create a role and role binding, use the kubectl apply command, as shown below:
kubectl apply -f role.yaml
kubectl apply -f rolebinding.yaml
kubectl get role,rolebinding
Creating a role and role binding in Kubernetes
After creating the role and role binding, the user will be able to access Pods in the default namespace.
kubectl get pods
Viewing Pods in the default namespace with the new user
The screenshot shows that the user can see the Pods in the default namespace. Let’s find out if he can also access Pods in the kube-system namespace.
kubectl get pods -n kube-system
The user received a forbidden error again because he wasn’t allowed access to Pods in the kube-system namespace. To allow him access, you need to create a role and role binding specifically in the kube-system namespace or create a cluster role and cluster role binding to give him cluster-wide access.
Check authorization actions
So far, we have created a new user account and granted the user read access to Pods in the default namespace. How does the user know what he is authorized to do in the cluster? The kubectl auth can-i command is helpful for this. To see if you are allowed to view Pods in the default namespace, use the following command:
kubectl auth can-i get pods --namespace default
To see if you have the ability to view the logs of the Pods, you would need to run the following command:
kubectl auth can-i get pods --subresource=log
In order to determine if you possess the authorization to create Pods located within a production namespace, you should execute this command:
kubectl auth can-i create pods --namespace production
Confirming an action is allowed for the user in Kubernetes
These commands return either yes or no, so you know whether an action is permitted.