Defender for Office 365 and Exchange Online Protection monitor all emails coming to your domain, blocking any harmful or spam messages. However, it can sometimes block emails from legitimate sources due to various reasons. As an administrator, you might want to whitelist certain senders or domains. This post will guide you on how to whitelist a domain in Microsoft 365, along with the necessary precautions to consider while doing it.
Prerequisites
The following components are necessary:
- Microsoft 365 tenant with Exchange Online licenses
- Exchange administrator rights over a tenant
- Windows PowerShell 5.1 or PowerShell 7
- Exchange Online V3 module (Connecting to your tenant steps)
Ways to whitelist a domain
We can whitelist domains in M365 in three different places:
- Mail flow rules in the Exchange Online portal
- Antispam policies in Microsoft Defender for Office 365 (MDO)
- Whitelist IP addresses using the connection filter policy in MDO
In the following sections, you will learn the details of each method.
Whitelist a domain using mail flow rules
This is a common method used to whitelist domains. First, access the Mail Flow tab in the Microsoft 365 portal via this link.
There, click Add Rule, and then select New Rule. This brings you to the following page. Enter a name for the rule, and then select the options, as shown in the text below.
Enter a name for the rule and then select the options mentioned here
Items to think about:
- Invoke this regulation if: In this instance, we’ll select the sender domain we’re interested in white-listing.
- The second scenario: Rather than just white-listing a domain and leaving ourselves open to false emails, we’re going to set up the rule with an additional requirement to validate the authentication results. Proceed as shown in the image. Click on the + symbol to input the second condition for the rule to be applied to an email. For the second requirement, pick The email headers in the initial field and contain any of these phrases in the next field. List the Mail header name as Authentication-Results. In the Input terms area, incorporate these two terms: dmarc=pass and dmarc=guestpass.
- Method/Execute the following:
- Determine the SCL Value: The subsequent move is to establish the spam confidence level (SCL) at -1 to circumvent spam filtering in Exchange Online Protection (EOP). An SCL value of -1 signifies that the emails treated by this transport rule will skip spam filtering. To know more about SCL values, refer to this link.
- Modify the email header: When resolving mail flow issues, having the message header also outline the mail flow rule that processed the email can be helpful. By extending another operation to our rule, we can achieve this. This would incorporate a specific entry in the header of the email being handled by this rule to identify it. As shown, we have established the header name as X-ETR and the value as Bypass spam filtering for authenticated sender <domain name>. From now on, the email header will include the values we’ve set for every email this mail flow rule handles. This will allow administrators to easily verify if an email has been treated by this rule.
We’ll choose more configurations for this rule on the next page.
The settings for this section are as follows:
Mode: You have the option to immediately enforce the rule by selecting ‘enforce’. Alternatively, you can run a trial of the new rule by selecting Test with Policy Tips or Test without Policy Tips. Policy Tips provide end users with warnings or information about potential actions on an email they are sending. For more information on Policy tips, please refer to this page.
Severity: There are five levels of severity to choose from: low, medium, high, not audit, and not specified. The ‘not specified’ option is selected by standard. When you assign a severity level to a rule, all emails processed by that rule will be grouped in the Exchange Transport Rule report. This allows you to easily assess how many emails a specific rule has processed when viewing the report. This page provides more detail about this report.
Dates: If you want the rule to be activated or deactivated on certain dates, input those dates into these fields.
Rule Processing: Microsoft 365 scrutinizes each email to see if it aligns with the criteria detailed in any of the mail flow rules. An email may pass one rule but Microsoft 365 ensures it checks the presence of other potentially applicable rules. Should you prefer to bypass this, choosing the Stop processing more rules option would then result in Microsoft 355 not comparing the email to other rules.
Defer rule processing: A mail flow rule that does not encompass an email would be disregarded by Microsoft 365. This is generally satisfactory, though occasionally some emails may slip through. If this is a concern or should you detect irregularities in how a rule is employed, activating the Defer the message if rule processing doesn’t complete option would result in the email being resubmitted for processing if the rule misses it initially. This enhances the probability of the email being categorized by the rule.
Match sender address: If your regulation includes terms to inspect for the email’s sender address, you can specify the parts of the email you’d like Microsoft 365 to search for the sender’s email address. By standard, the sender’s communicating mediums are the values of From, Sender, and Reply-to in the communication header. The alternative is the envelope, translating to a search for the sender in the Mail-From (return to) value. The third choice allows for the sender address to be looked for either in the message header or the envelope. This is the advised strategy.
Select Next, go over your rule settings, then select Finish.
It may take a few hours for the rule to be effective.
Whitelist a domain in Microsoft Defender for Office 365 (MDO)
Whitelisting a domain through Microsoft 365 Defender is the recommended approach compared to creating mail flow rules for the same purpose. A high number of mail flow rules might slow down email delivery, as Exchange Online verifies emails against all the rules.
Access the Anti-spam policy page and select the anti-spam inbound policy for your tenant.
Whitelisting a domain in the antispam policy
Scroll to the bottom, and click Edit allowed and blocked senders and domains. On the next page, click Allow domains, and then add the domain you wish to whitelist. Then click Save.
Here we add the domain we wish to whitelist in the anti spam policy
Whitelist a domain using its IP address
The last option is to whitelist the domain’s IP address. This can be achieved through the Connection filter policy in MDO.
Again, access the Anti-spam page and select the connection filter policy in effect on your tenant. On the following page, you can click the Edit option.
On the next page, add the IP addresses you want to whitelist in the Allow messages field. Then click Save.
Allow list in the Connection filter
Microsoft has its own list of IPs obtained from third parties, which it considers safe. If you select this option, then those IPs bypass the security checks in your tenant. This list is maintained by Microsoft, and you won’t be able to add anything to it.
Testing the mail flow rule
After whitelisting the domain, there are several ways to verify that it is indeed allowed.
Message trace
The easiest way to track emails from the whitelisted domain is to run a message trace either from the portal or through PowerShell. The message trace result below shows that the email was handled by a mail rule named Whitelist Domain. This is the rule we created.
M365 Defender Threat Explorer
You can also check the effectiveness of the new mail flow rule in the Threat Explorer. You can access it via this link. While whitelisting the domain in the antispam policy in the earlier section of the article, you specified the sender’s domain. Use the sender’s domain to search for all emails from that domain. Refer to this article for more information.
The following example confirms that the domain whitelisting done through the antispam policy is in effect.
PowerShell
The third option is to use good old PowerShell.
Run the following command to find the email you wish to trace:
Get-MessageTrace -SenderAddress <emailaddress> -RecipientAddress <emailaddress>-StartDate <date> -EndDate<date> | select Received, senderaddress, recipientaddress, subject, status, *id
Note the messagetraceid of the email you wish to investigate from the output.
Run the following command with the message trace ID noted from the above command’s output:
Get-MessageTraceDetail -MessageTraceId <TraceID> -RecipientAddress [email protected] | Select-Object message*,date,event,action,detail
The email was handled by our new transport rule and the required actions were taken.
Message header
Analyzing a message header is useful for verifying the effect of your rule and troubleshooting challenges. Initially, you need to locate the message header, which can be found in the email through Outlook or OWA. For an explanation of the necessary steps, refer to the guide provided here.
You can also search for the email using the Threat Explorer. Click on it to access a screen that lets you view the message header, contingent on the permissions assigned to you in the tenant.
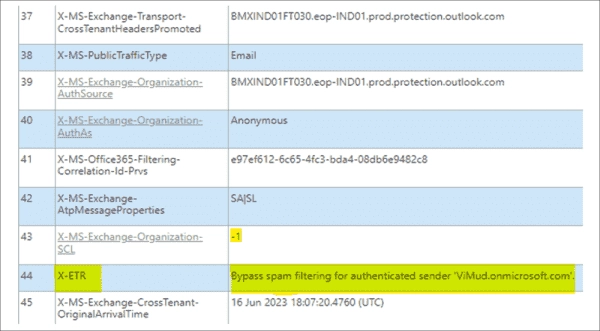
Once you have retrieved the header, you can analyze it at exrca.com. For example, the Spam Confidence Level (SCL) value is -1, as demonstrated in field no. 43 of the below-mentioned screenshot. Additionally, the screenshot displays the X-Exchange Transport Rules (X-ETR) value in field no. 44 as ‘Bypass spam for authenticated sender’ – a setting we determined in the mail flow rule in an earlier chapter. This is a firm indication that your mail flow is operating optimally.