For security reasons, the clipboard is disabled by default in the VMware vSphere Client. This means that you cannot use copy/paste operations between the OS and your computer when you are connected to the VMware virtual machine console. This article explains how to enable clipboard copy and paste for a VMware VM.
Copy, Paste, Drag-and-Drop Features Not Working in VMware Workstation
By default, VMware Workstation allows you to use the clipboard for copy/paste operations through the Virtual Machine Management Console.
Check the following if the clipboard does not work for any reason:
- Ensure VMware Tools are installed in the virtual machine and update them if needed.
- Ensure that both clipboard and drag-and-drop features are active in the virtual machine settings.
- Open VMware Workstation –> VM –> Settings –> Options tab.
- Select Guest Isolation.
- Here, you’ll find two options:
Enable drag and drop
Enable copy and paste
Enable both and save the VM settings.
- Initiate your Virtual Machine.
You can now make use of the clipboard to transfer files and text between your host and guest OS within a VMware Workstation virtual machine.
Alternatively, you can enable these options manually in the virtual machine’s VMX file.
isolation.tools.copy.disable = “FALSE”
isolation.tools.dnd.disable = “FALSE”
isolation.tools.paste.disable = “FALSE”
isolation.tools.hgfs.disable= “FALSE”
Enabling Clipboard Copy and Paste in VMware ESXi
Now let’s look at enabling the clipboard in the VMware vSphere Web Client or VMware ESXi Host Client (HTML5-based).
-
For the clipboard to work in an ESXi virtual machine, VMTools must be installed in the guest OS; Linux VMs require open-vm-toolbox or open-vm-tools to be installed. Check they are installed (for Ubuntu):
-
Power off your virtual machine;
-
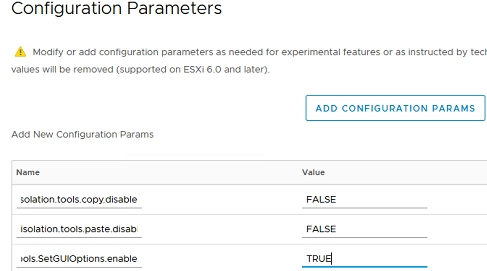
Open the VM settings. Go to the VM Options -> Advanced -> Edit Configuration;
-
Click Add Configuration Params and add three options:
-
Save the changes and power on the VM;
-
Ensure that the clipboard now works for this VM so that you can copy and paste content via VMRC.
$ sudo service vmware-tools status
isolation.tools.copy.disable = FALSE
isolation.tools.paste.disable = FALSE
isolation.tools.setGUIOptions.enable = TRUE
The VMX configuration file of the virtual machine on the datastore can also be used to enable these parameters.
-
Connect to the ESXi host using SSH;
-
Edit the virtual machine VMX file using vi:
-
Add the lines:
-
Save the changes and run the VM.
# vi /vmfs/volumes/volume_id/mun-srv01/mun-srv01.vmx
isolation.tools.copy.disable="FALSE"
isolation.tools.paste.disable="FALSE"
isolation.tools.SetGUIOptions.enable="TRUE"
You can enable the clipboard for all VMs on an ESXi host at once.
- First, backup the /etc/vmware/config file:
# cp /etc/vmware/config /etc/vmware/config_bak - Edit the file:
# vi /etc/vmware/config - Add the lines:
vmx.fullpath = "/bin/vmx"
isolation.tools.copy.disable="FALSE"
isolation.tools.paste.disable="FALSE"
isolation.tools.SetGUIOptions.enable="TRUE"
- Reboot the ESXi host.
You can also enable clipboard options using PowerShell.
- Install the VMware PowerCLI module on your computer;
- Connect to vCenter or ESXi:
Connect-VIServer <FQDN_of_vCenter_or_ESXi_host> - Enable the following options for your VM:
$VM = Get-VM -Name mun-srv01
 New-AdvancedSetting -Entity $VM.name -Name isolation.tools.copy.disable -Value False -Confirm:$false -Force:$true
 New-AdvancedSetting -Entity $VM.name -Name isolation.tools.paste.disable -Value False -Confirm:$false -Force:$true
 New-AdvancedSetting -Entity $VM.name -Name isolation.tools.setGUIOptions.enable -Value True -Confirm:$false -Force:$true
If the clipboard doesn’t work in the HTML version of your VMware client, try to install VMRC on your computer and use it to connect to the VM.