Pulumi supports several programming languages, such as Python, TypeScript, C#, and Go, enabling DevOps engineers to use the same language for application code and infrastructure definition. You can define resources from major cloud providers like AWS, Azure, and GCP, as well as Kubernetes resources and many others, all with your chosen programming language. Pulumi uses a declarative approach to define the desired state of the infrastructure. You specify what you want the end result to be, and Pulumi figures out the steps to achieve that state!
The code
Below is the entire code of the project. I will explain each line in the text below.
main.go
package main
import (
“github.com/pulumi/pulumi-aws/sdk/v6/go/aws/ec2”
“github.com/pulumi/pulumi/sdk/v3/go/pulumi”
“github.com/pulumi/pulumi/sdk/v3/go/pulumi/config”
)
func main() {
pulumi.Run(func(ctx *pulumi.Context) error {
config := config.New(ctx, “”)
// Stack values
IngressIp := config.Require(“IngressIp”)
VpcId := config.Require(“VpcId”)
SubnetId := config.Require(“SubnetId”)
// Getting latest Amazon Linux 2 image
ami, err := ec2.LookupAmi(ctx, &ec2.LookupAmiArgs{
Filters: []ec2.GetAmiFilter{
{
Name: “name”,
Values: []string{“amzn2-ami-hvm-2.0.*-x86_64-gp2”},
},
},
MostRecent: pulumi.BoolRef(true),
Owners: []string{“amazon”},
})
if err != nil {
return err
}
// Security group which allows SSH traffic
sg, err := ec2.NewSecurityGroup(ctx, “ec2SecurityGroup”, &ec2.SecurityGroupArgs{
Egress: ec2.SecurityGroupEgressArray{
ec2.SecurityGroupEgressArgs{
CidrBlocks: pulumi.StringArray{
pulumi.String(“0.0.0.0/0”),
},
Protocol: pulumi.String(“-1”),
FromPort: pulumi.Int(0),
ToPort: pulumi.Int(0),
},
},
Ingress: ec2.SecurityGroupIngressArray{
ec2.SecurityGroupIngressArgs{
CidrBlocks: pulumi.StringArray{
pulumi.String(IngressIp),
},
Protocol: pulumi.String(“tcp”),
FromPort: pulumi.Int(22),
ToPort: pulumi.Int(22),
},
},
VpcId: pulumi.String(VpcId),
})
if err != nil {
return err
}
// Create EC2 instance with Security group and image
ec2Instance, err := ec2.NewInstance(ctx, “ec2Instance”, &ec2.InstanceArgs{
Ami: pulumi.String(ami.Id),
InstanceType: pulumi.String(“t2.micro”),
SubnetId: pulumi.String(SubnetId),
VpcSecurityGroupIds: pulumi.StringArray{sg.ID()},
Tags: pulumi.StringMap{
“Name”: pulumi.String(“Pulumi-example”),
},
})
if err != nil {
return err
}
ctx.Export(“InstanceId”, ec2Instance.ID())
return nil
})
}
The pulumi new command
Before we commence, you need to follow Pulumi’s guide to install it on your operating system of choice,
Once you have installed, you can start building your first project. Create an empty directory and open it via the command line:
mkdir pulumi_demo && cd pulumi_demo
In order to establish a fresh Pulumi project and stack through a template, the Pulumi command, pulumi new, is required. This command provides the capability of constructing new projects through an array of templates and then personally modifying them to meet your unique requirements. Here are the elementary instructions:
pulumi new <provider>/<template-name>
For purposes of demonstrating, I am in need of an empty main.go file, therefore, I would simply execute this command:
pulumi new go
When implementing the Pulumi new command, you will be asked a range of questions such as the project name, project description, and stack name:
Using pulumi new to create a new project
The Pulumi project
From your favored IDE, open the main.go file. We will now go through the lines of code, starting with the import block.
package main
import (
“github.com/pulumi/pulumi-aws/sdk/v6/go/aws/ec2”
“github.com/pulumi/pulumi/sdk/v3/go/pulumi”
“github.com/pulumi/pulumi/sdk/v3/go/pulumi/config”
)
Package and imports
package main specifies that this Go file is the entry point for the executable, our main program. This is typical for all Go programs.
Import necessary packages
These are the packages that our program will be using to build. We have three packages, which are:
- github.com/pulumi/pulumi-aws/sdk/v6/go/aws/ec2, which is the Pulumi AWS EC2 SDK for resource management.
- github.com/pulumi/pulumi/sdk/v3/go/pulumi, is the Core Pulumi SDK for defining and managing resources.
- github.com/pulumi/pulumi/sdk/v3/go/pulumi/config, which is the Pulumi configuration management package.
The main function
func main() is the entry point of the executable.
pulumi.Run(func(ctx *pulumi.Context) error {
This line initiates the Pulumi runtime, providing a context and defining the main function as an anonymous function. The function returns an error.
We can now look at the functions we will use from our imported packages.
You have the ability to establish configurations for stacks through the pulumi config CLI command, or via modifications to the Pulumi.<stack>.yaml file. Consider “stacks” akin to the layers present in a cake. Each also represents an environment or a feature branch, providing the opportunity to developers for testing and maintaining them in isolation.
The Pulumi’s configuration management package is employed to fetch this information from the stack file.
The following values can be set in the pulumi stack file from the command line:
pulumi config set IngressIp 1.1.1.1/32
pulumi config set VpcId Vpc123456
pulumi config set SubnetId Subnet-654321
Using Pulumi’s configuration management package, we can retrieve and use these values in our code.
config := config.New(ctx, "")
This line initializes a Pulumi configuration object, config in this case. Using an empty string in the second parameter, namespace implies default configuration.
Now we have the Config value captured in the config variable, we can retrieve those values:
// Stack values
IngressIp := config.Require(“IngressIp”)
VpcId := config.Require(“VpcId”)
SubnetId := config.Require(“SubnetId”)
The function Require loads a configuration value by its key. If the key doesn’t exist, it leads to a panic error.
The subsequent part of the code leverages the AWS EC2 package to locate an AMI:
// Fetching latest Amazon Linux 2 image
ami, err := ec2.LookupAmi(ctx, &ec2.LookupAmiArgs{
Filters: []ec2.GetAmiFilter{
{
Name: “name”,
Values: []string{“amzn2-ami-hvm-2.0.*-x86_64-gp2”},
},
},
MostRecent: pulumi.BoolRef(true),
Owners: []string{“amazon”},
})
if err != nil {
return err
}
ami, err := ec2.LookupAmi(ctx, &ec2.LookupAmiArgs{...}
This line initiates a search for the latest Amazon Machine Image (AMI) that matches the specified criteria.
&ec2.LookupAmiArgs{...}
This line creates an instance of the ec2.LookupAmiArgs structure that contains the AMI lookup parameters, such as Filters, MostRecent, and Owners.
Filters: []ec2.GetAmiFilter{...}
This line sets up filters that can help in narrowing down the AMI search.
It is possible to include a pattern in the AMI search by using a string with wildcards.
{ Name: "name", Values: []string{"amzn2-ami-hvm-2.0.*-x86_64-gp2"} }
Using the MostRecent: pulumi.BoolRef(true) parameter allows us to use the latest and greatest AMI found.
Owners: []string{"amazon"}
This line specifies that the AMI should be owned by amazon, ensuring it’s an official Amazon image.
Before building the EC2 image, we define the required security access with a Security Group that we can attach to the EC2:
// Security group that allows SSH traffic
sg, err := ec2.NewSecurityGroup(ctx, “ec2SecurityGroup”, &ec2.SecurityGroupArgs{
Egress: ec2.SecurityGroupEgressArray{
ec2.SecurityGroupEgressArgs{
CidrBlocks: pulumi.StringArray{
pulumi.String(“0.0.0.0/0”),
},
Protocol: pulumi.String(“-1”),
FromPort: pulumi.Int(0),
ToPort: pulumi.Int(0),
},
},
Ingress: ec2.SecurityGroupIngressArray{
ec2.SecurityGroupIngressArgs{
CidrBlocks: pulumi.StringArray{
pulumi.String(IngressIp),
},
Protocol: pulumi.String(“tcp”),
FromPort: pulumi.Int(22), // SSH port
ToPort: pulumi.Int(22),
},
},
VpcId: pulumi.String(VpcId),
})
if err != nil {
return err
}
sg, err := ec2.NewSecurityGroup(ctx, "ec2SecurityGroup", &ec2.SecurityGroupArgs{...}
This snippet creates an EC2 Security Group with the specific egress and ingress rules, giving permission for SSH traffic.
Both Egress and Ingress types consist of similar attributes. The Egress type, ec2.SecurityGroupEgressArray{…}, sets the egress rules (outgoing traffic) for the security group. On the other hand, the Ingress type, ec2.SecurityGroupIngressArray{…}, establishes the ingress rules (incoming traffic) for the security group.
Properties on each, CidrBlocks, Protocol, FromPort, and ToPort, permit us to specify the requirements we need for the resource, an EC2, in our instance.
The final value we establish in the Security Group configuration is the VPC ID, VpcId: pulumi.String(VpcId). This links the security group with a certain Virtual Private Cloud (VPC) identified by the VpcId variable.
The concluding segment of our Pulumi project is the creation of the EC2. Here is how this part of the code appears:
// Security group that enables SSH traffic
sg, err := ec2.NewSecurityGroup(ctx, “ec2SecurityGroup”, &ec2.SecurityGroupArgs{
Egress: ec2.SecurityGroupEgressArray{
ec2.SecurityGroupEgressArgs{
CidrBlocks: pulumi.StringArray{
pulumi.String(“0.0.0.0/0”),
},
Protocol: pulumi.String(“-1”),
FromPort: pulumi.Int(0),
ToPort: pulumi.Int(0),
},
},
Ingress: ec2.SecurityGroupIngressArray{
ec2.SecurityGroupIngressArgs{
CidrBlocks: pulumi.StringArray{
pulumi.String(IngressIp),
},
Protocol: pulumi.String(“tcp”),
FromPort: pulumi.Int(22), // SSH port
ToPort: pulumi.Int(22),
},
},
VpcId: pulumi.String(VpcId),
})
if err != nil {
return err
}
<p>This line creates an EC2 instance using the ec2.NewInstance function.</p>
<pre>ec2Instance, err := ec2.NewInstance(ctx, “ec2Instance”, &ec2.InstanceArgs{…})</pre>
<p>Specifies the Amazon Machine Image (AMI) for the instance using the AMI ID obtained in the earlier AMI lookup (ami variable).</p>
<pre>Ami: pulumi.String(ami.Id)</pre>
InstanceType: pulumi.String("t2.micro")
This line defines the instance type as “t2.micro,” which represents a unique size and performance-grade for the EC2 instance.
SubnetId: pulumi.String(SubnetId)
This line associates the EC2 instance with a distinct subnet identified via the SubnetId variable.
VpcSecurityGroupIds: pulumi.StringArray{sg.ID()}
This line of code links the EC2 instance with the security group that was previously created. The security group is referred to by its ID, which is stored in the variable sg.
Tags: pulumi.StringMap{"Name": pulumi.String("Pulumi-example"),}
In this line, tags for the EC2 instance are being defined. One of these tags is a Name tag, which in this instance has been set to “Pulumi-example.”
The last part of the file uses the Export function from context. This will display the instance ID as a text value on the screen:
ctx.Export("InstanceId", ec2Instance.ID())
This line exports the created EC2 instance ID, making it accessible for further reference or integration with other resources.
Deploy the EC2 instance
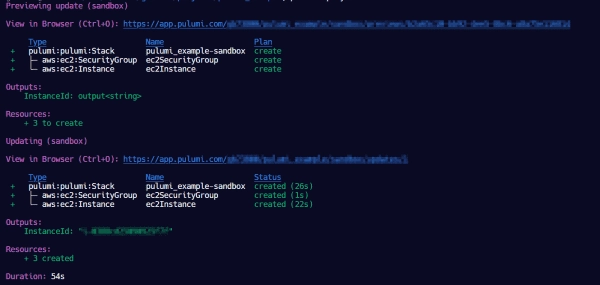
Our code is now written, and we are ready to deploy. You run the pulumi up CLI command to deploy our program. When run, Pulumi will do a preview of your build:
Once complete, we can now check the console:
Here, we can see the newly created EC2 instance. We can also look and see the Security Group:
console view of newly created security group
Summary
If you have experience with any other Infrastructure as Code tools, you will be familiar with Pulumi. With Pulumi, rather than writing configuration files to manage your cloud resources (like in YAML or JSON formats), you use real programming languages to define your resources, which provides the advantages of loops, functions, classes, and other familiar constructs from software development.
If you are looking for an IaC tool that is easy to use, flexible, and powerful, then Pulumi is an excellent option.