In the first step, we install GNS3 on a physical computer, in our example, a Windows PC. We also download the appropriate VM for our test network, which can be done during the GNS3 installation process.
The installation assistant offers a corresponding option for this.
Selecting components for GNS3 installation
Here, you select the VM for the virtualization solution, with options including VMware, Hyper-V, and VirtualBox. We choose VMware Workstation.
Choosing a virtual appliance for the virtualization platform
During the installation, the assistant downloads some additional files.
Setting Up GNS3-VM
Once you’ve extracted the files from the archive, the GNS3 Appliance’s OVA file can be loaded into VMware Workstation by navigating to the File => Open options. You can allocate a name to the VM during this process, such as GNS3 VM, and determine where it should be stored.
The settings for the VM should remain untouched. If any alterations are required at a later stage, you can implement these through GNS3. There’s no urgency to initiate the VM right away.
Configuring GNS3 with VMware Workstation
In order to establish a test network, the software needs to be installed on the computer that operates the GNS3-VM. Once GNS3 has been initiated, the setup assistant will then commence. In the initial stage, you’ll want to select Run appliances in a virtual machine as the variant for our setup.
Afterward, select the path to the GNS3 server, the port, and the IP address.
In the next step, the assistant checks if it can connect to the server successfully. It should then recognize the previously imported VM. Here, you can change its settings if necessary.
Once the VM is successfully started and connected to GNS3, the GNS3 management interface displays this under Servers Summary on the right side. A green icon indicates that the host and the VM are available. In VMware Workstation, the VM’s console is also visible.
Creating a new test network as a project
Begin a new project by selecting File -> New blank project and designate the directory for saving the project data. Subsequently, you are able to add virtual devices to the network.
For instance, creating switches involves clicking the corresponding icon (which appears as two opposing arrows) or showcasing all devices that are presently available.
With the use of New template, additional GNS3-compatible devices can be imported as appliances. Templates for this process can be found in the GNS3 Marketplace. Follow the steps New template => Import an Appliance file (.gnsa3 extension) to execute the command.
Importing a template for a device to add to the network
Select the downloaded GNS3 file and execute the command Install the appliance on the GNS3 VM.
Installing a virtual Cisco switch in the test network
If you can’t find a suitable template, you can get templates for more network devices and servers via New template and Install an appliance from the GNS3 server. For instance, a template for the Microsoft OS is available under Guests => Windows Server.
Templates for installing devices in the virtual network
Select the required files through an assistant, such as the ISO image for Windows Server 2022 or a VMDK file for Windows 10.
Drag the desired templates from the left into the main window. This allows multiple devices to be added to the project window, in our example, two switches and a server.
To connect the switches, first select the connection icon at the bottom, click on the first switch, and specify the desired interface. Then, click on the second switch and select the desired port. The configured devices run as containers in the GNS3-VM.
Connecting switches in the test network
GNS3 displays the names of the connected ports at the top of the toolbar when you click the fourth icon from the left. You can power on and control the individual devices through the context menu.
These devices are initially powered off when added to the test environment. However, all test devices in the environment can be simultaneously started by using the green icon on the toolbar. You can open the console of the virtual device via the context menu.
By dragging a Windows Server that’s been imported via a template into the window, you can connect it to the switches in the same manner that the switches were connected to each other.
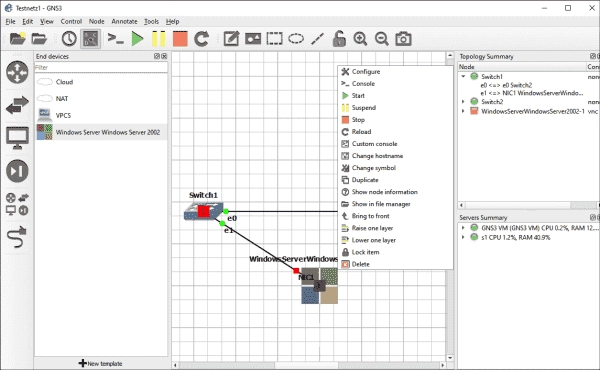
Integrating Windows Server into the network and connecting with the switches.
The Windows Server operates in its own VM, which can be configured through the server’s context menu.
Adjusting settings for the virtual Windows Server
You can open the server’s console via the context menu and install it based on your preferences. It’s linked in the virtual environment with the switches set up previously.
Installing Virtual Windows Server in the test network
Connecting virtual and physical networks
Devices within a GNS3 network, by default, cannot establish communication with the outside world. The simplest approach to merging the virtual and physical networks involves the use of the NAT device. Add this via drag-and-drop, however, this only permits outgoing connections.
For incoming connections, the Cloud device should be used. Set the GNS3-VM as the server and incorporate a router into the network. The requirement then exists to either configure an existing or create a new network adapter of the GNS3-VM as bridged.
Next, set up a router within the virtual network to link it with the physical network. The adapter which has been configured as bridged is then used as the routing interface to the external network. You can refer to the GNS3 documentation’s detailed explanation of this operation.
Summary
The free Graphical Network Simulator-3 (GNS3) enables the simulation of complex networks on a single computer. It runs in a virtual appliance that can be downloaded for various platforms. The configuration is done via an intuitive graphical interface, where devices can be added via drag and drop.
The GNS3 community provides many templates for various devices, which help with network construction. Among these are several OS templates and templates for Cisco switches.