During the final setup phase, Windows 11 requires a network connection to the Internet. The Internet connection is used to connect to your online Microsoft account and to receive the latest security updates. If your computer doesn’t have network adapters, if the Driver Store is missing drivers for the installed network adapter, or if your network is disconnected, you won’t be able to complete the Windows 11 installation.
Let’s connect you to a network.
You’ll need an internet connection to continue setting up your device. Once connected, you’ll get the latest features and security updates.
In this case you can:
Install Windows 11 with a Local User Account
To continue installing Windows 11, you can use a local account:
- To open the command prompt, press
Shift+F10on the installation screen; - Run the command:
oobebypassnro - After the computer restarts, the ‘I don’t have Internet‘ button will appear on the OOBE screen. Click it to proceed to the limited setup mode, where you will be prompted to create a local user;
- After logging into Windows, you can install the missing network adapter drivers from a USB stick.
Load Network Drivers During Windows 11 Setup
Suppose your computer/laptop has connected Wi-Fi/LAN network adapters for which there are no drivers in the Windows installation image. In that case, you can install the necessary drivers directly during the Windows installation process.
The first step is to identify the model of a network adapter on your computer. This can be found in the manufacturer’s specification or you can identify it manually.
Press Shift+F10 on the Setup screen and run the devmgmt.msccommand. Open the properties of the unknown device, go to the Details tab, select the Hardware IDs property, and copy the ID.
Using the VEN and DEV identifiers found, you can determine the model of the network adapter and download a driver for it from the vendor’s website.
Download the driver and extract it to a USB flash drive. Connect the USB flash drive to your Windows 11 computer.
From the Setup screen, press Shift+F10 to open the command prompt.
Check the drive letter that has been assigned to your USB flash drive:
wmic logicaldisk get volumename,name
In this example, the USB drive is assigned the letter F:.
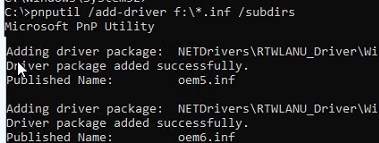
To install all the drivers (described INF files) from a flash drive in Windows, run the command:
pnputil /add-driver F:*.inf /subdirs
Rescan devices:
pnputil /scan-devices
Close the command prompt and restart the computer. Windows 11 should automatically detect your network adapter and install a suitable driver from the Driver Store. You can then proceed with the Windows 11 installation.
Unused device drivers can be manually removed from the Windows Driver Store.
Inject Network Drivers into a Windows 11 Installation Image
To avoid installing device drivers manually, you can add the network drivers to the Windows ISO/WIM installation image.
Learn more about installing Windows 11 on unsupported hardware (without TPM, Secure Boot, etc.).