How CoreDNS works
CoreDNS is a modern, flexible, extensible DNS server with a modular architecture. You can easily extend it with plugins, and it has no scalability concerns. The Kubernetes cluster configured with Kubeadm runs CoreDNS as a Deployment with two replicas and exposes it with a kube-dns service in the kube-system namespace. The service name kube-dns is intended to offer backward compatibility with the legacy DNS server.
kubectl get deploy -n kube-systemkubectl get svc -n kube-system
View CoreDNS deployment and service in the cluster
The above hyperlink takes the reader to a screenshot showing the Deployment and service objects. The second command also indicates the Cluster-IP of the kube-dns service. The following commands will help you view the service endpoints and the IP address of the Pods.
Kubectl describe svc kube-dns -n kube-systemkubectl get pods -n kube-system -l k8s-app=kube-dns -o wide
View kube dns service endpoints and the IP addresses of the CoreDNS Pods
The first command displays the IP address of the CoreDNS service, while the second command reveals the IP addresses of the Pods acting as service endpoints. The primary nameserver for the Kubernetes cluster is represented by the CoreDNS service IP address, which in our case is 10.96.0.10.
Corefile—the CoreDNS configuration file
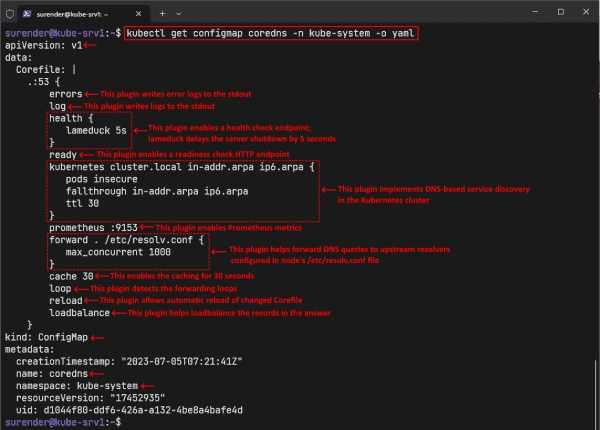
The DNS server’s behaviour is defined by a configuration file used by CoreDNS called the Corefile. This file enables you to configure DNS zones, plugins, the rules for forwarding, and other settings that manage DNS requests. In a Kubernetes cluster, the Corefile is saved in a ConfigMap resource named coredns. The following command can be utilized to view it:
kubectl get configmap coredns -n kube-system -o yaml
Let’s break down the Corefile for better understanding. The Corefile begins with a DNS zone name. The .:53 indicates that the CoreDNS server should handle all possible queries and listen on the default Port 53. All the keywords in the Corefile (e.g., errors, log, health, ready, kubernetes, and forward) are plugins that perform a particular task. The plugins are configured using directives, and the options for each directive vary with the plugin. Some plugins have no directives; some have one or more (required and optional). Let’s discuss some of the most common plugins.
- kubernetes: This is an essential plugin for implementing DNS-based service discovery in the Kubernetes cluster. It supports many directives that are worth discussing.
The plugin’s syntax follows the pattern kubernetes [zones]{}, where zones specify the DNS zones for which the kubernetes plugin is authoritative. As per the screenshot, the cluster.local zone is for the default cluster domain, while in-addr.arpa and ip6.arpa are the reverse DNS zones for the IPv4 and IPv6 addresses, respectively. The curly braces include various directives for adjusting the plugin’s behavior.
- The pods directive is used to set the mode for handling IP-based A records for the Pods. It can have three possible values:
-
disabled—Setting this mode means that the kubernetes plugin does not process Pod requests and returns an NXDOMAIN as a response when you try to query a Pod name. This is the default mode.
- verified—Setting this mode means the kubernetes plugin will process Pod requests and return the Pod’s IP address only if it exists in the same namespace. This mode is more secure but also increases the memory footprint of CoreDNS, since it needs to watch all Pods.
-
insecure—Setting this mode means the kubernetes plugin will process Pod requests and return the Pod’s IP address without verifying that the IP address belongs to a Pod in the specified namespace. This mode is not secure because it can expose Pods in other namespaces. It is only there for backward compatibility with the legacy kube-dns.- The fallthrough directive helps pass the unhandled queries to the next plugin in the chain (e.g., forward). It allows the kubernetes plugin to delegate the reverse DNS queries to another plugin so it can focus on handling the DNS queries for the cluster domain (e.g., cluster.local) itself.
- The ttl option allows you to set a custom TTL for the responses. The default value is 5 seconds, but you can set it between 0 and 3600.
- log: The log plugin has no directives and writes logs to the STDOUT. If you omit it in the Corefile, you will see no logging except errors, which are suitable for large clusters with many DNS requests.
- errors: The errors plugin writes the error logs to the STDOUT. If you omit it in the Corefile, you will see no error logs, which could make troubleshooting any issues harder.
- health: The health plugin enables a health check endpoint for the DNS server, allowing you to monitor the server’s status. The lameduck 5s, which you can see in the screenshot, is the duration in seconds (5 seconds, by default), for which the server delays the shutdown after receiving a SIGTERM signal. This duration is handy for a graceful shutdown without causing abrupt disruptions.
- ready: The ready plugin enables a readiness check HTTP endpoint for the DNS server, which allows you to monitor when the server and all its plugins are ready to serve DNS requests. The ready plugin does not return OK when the server is in lameduck mode.
- prometheus: This plugin enables Prometheus metrics for the DNS server, which allow you to monitor the CoreDNS server and troubleshoot any issues.
- forward: The forward plugin allows you to forward DNS queries to other DNS servers that can handle them. It supports the UDP, TCP, and DNS-over-TLS (DoT) protocols and uses in-band health checking to detect and avoid unhealthy upstream servers. The forward . /etc/resolv.conf, which you can see in the screenshot, instructs the CoreDNS server to forward the DNS queries that could not be resolved by the kubernetes plugin to the upstream resolvers specified in the /etc/resolv.conf file of the Kubernetes node. The maxconcurrent 1000 directive limits the number of concurrent queries to 1000, which means the new queries will result in a REFUSED response.
- cache: The cache plugin enables a frontend cache for DNS queries for up to 3600 seconds (default). The cache 30, which you can see in the screenshot, sets the caching TTL at 30 seconds.
- loop: This plugin detects simple forwarding loops and halts the CoreDNS server when a loop is detected to prevent it from consuming too many resources on the node.
- reload: The reload plugin allows automatic reload of the Corefile once it is changed.
- loadbalance: The loadbalance plugin acts as a DNS load balancer to randomize the order of A, AAAA, and MX records returned in the answer.
Please note that covering all plugins and their options is beyond the scope of this post. To learn more about CoreDNS plugins, check out the official docs.
Changing the Corefile
As stated earlier, the CoreDNS runs as a Deployment object in the Kubernetes cluster, which runs two Pods for redundancy. The Corefile is passed to these Pods as a ConfigMap, making it easier to edit the Corefile when needed.
# Run this command to view all CoreDNS Pods
kubectl get pods -n kube-system -l k8s-app=kube-dns -o wide
# Run this command to describe a CoreDNS Pod
kubectl describe pod coredns-5d78c9869d-7hhb5 -n kube-system
Understanding how the Corefile is passed to the CoreDNS Pods in Kubernetes
The first command lists all the Pods managed by the CoreDNS Deployment, and the second command describes a CoreDNS Pod. Don’t forget to specify your actual Pod name with the second command. The paragraph describes that the coredns ConfigMap is defined as a volume in the Pod. The volume is then mounted in the /etc/coredns container path as read-only, and finally, the /etc/coredns/Corefile is passed as an argument to the coredns container that runs in the Pod.
To make any changes to the Corefile, you can edit the ConfigMap with this command:
kubectl edit configmap coredns -n kube-system
Changing the CoreDNS configuration file Corefile
The above command opens the ConfigMap object for in-place editing. For the demo, I changed the pods mode from insecure to disabled. The reload plugin periodically (30 seconds, by default) checks the Corefile by calculating the SHA512 checksum. When the file is changed, the plugin gracefully reloads it without causing any service disruption.
If you make significant changes to the Corefile, the Pods might not automatically detect the changes. In this case, you can kill the Pods manually with this command, and ReplicaSet will create new Pods with an updated configuration file for you.
kubectl delete pods -n kube-system -l k8s-app=kube-dnskubectl get pods -n kube-system -l k8s-app=kube-dns
Forcing the recreation of CoreDNS Pods after changing the Corefile
The screenshot reveals that new Pods are automatically generated.
How are Pods utilizing CoreDNS?
Understanding the notions of CoreDNS and the Corefile may leave you pondering about how each Pod in the cluster utilizes CoreDNS. What configures them for CoreDNS usage?
It’s probably known to you that kubelet is the one in charge of executing Pods on Kubernetes nodes. The exposition of the CoreDNS Deployment through a kube-dns service was also discussed. The kubeadm tool is configured to make use of the kube-dns service IP address as the cluster DNS server on each node. Here is the command to view the kubelet configuration:
cat /var/lib/kubelet/config.yaml
Viewing the cluster DNS IP address in the kubelet configuration
The screenshot shows the clusterDNS and clusterDomain set in the kubelet configuration file. When the kubelet creates a Pod, it adds the clusterDNS IP address to the /etc/resolv.conf file of the Pod to help resolve internal service names within the cluster. The external names are resolved by the forward plugin specified in the Corefile. Remember the forward . /etc/resolv.conf line of the Corefile?
Let’s quickly run a temporary Pod and view its /etc/resolv.conf file.
kubectl run test-pod -it --rm --restart=Never --image=tutum/dnsutils -- /bin/bash
Run a test Pod and view its resolv.conf file
You can see that the kube-dns service IP address is already configured as the nameserver in the Pod. Suppose you run the host command to resolve a nonfully qualified domain name (e.g., 4sysops.com), as shown in the screenshot. In that case, you will notice that all the search domains are appended to the keyword in the same order mentioned in the resolv.conf file. First, it tries 4sysops.com.default.svc.cluster.local, where default is the namespace and cluster.local is the cluster domain. This behavior allows Pods to discover internal services within the Kubernetes cluster.
To resolve a service name in the same namespace, you need to specify its name, and CoreDNS will do it for you. However, to access a service in a different namespace, you must use the service-name.namespace format. For example, if your Pod runs in the default namespace, you will run this command to get the IP address of the kube-dns service that runs in the kube-system namespace.
host kube-dns.kube-system
Performing a DNS lookup in a Kubernetes Pod
To view the DNS logs, run the kubectl logs command, as shown below:
kubectl logs -f coredns-5d78c9869d-6fc7b -n kube-system
Viewing CoreDNS logs in Kubernetes
Don’t forget to specify the correct CoreDNS Pod name with the kubectl logs command. The DNS queries are load balanced across both Pods, so you might need to view the logs of both Pods.