In this blog post, we will dive deeper into the concept of branches and explore how they can be merged using pull requests (PR) in Git and GitHub.
If you’re new to this topic, we highly recommend checking out our previous article to understand the background, code samples, and environment setup. It lays the foundation for this discussion.
Merging branches is a powerful feature in Git and GitHub, as it allows you to bring changes from one branch into another. In GitHub, this merging process is done through pull requests. A pull request serves as a mechanism for reviewing and taking action on changes submitted to a branch. The changes can either be accepted (via merging) or rejected. It also becomes a space for collaboration and discussion between collaborators on code changes, leading to a series of commits to bring the branch to an acceptable state before merging. Furthermore, it provides control over what code gets merged into a codebase.
Now, let’s get into the practical steps. In this section, we will perform a pull request to merge a feature branch called “convert-os-to-platform” into the main branch on GitHub. A feature branch is typically created to develop and test a specific feature before introducing it to the production-ready version of an application.
To start, open GitHub and navigate to the repository that you have created for this tutorial. Click on the “branches” tab to see a list of branches associated with your repository.
Here, you will find the main branch and the convert-os-to-platform branch that we pushed to GitHub in the previous article.
To create a pull request, click on “New pull request” and select the “convert-os-to-platform” branch as the base branch for the comparison.
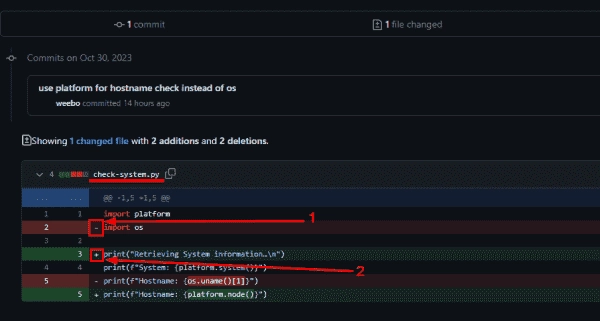
GitHub will bring you to the “Open a pull request” page. Here, you can compare the changes between the two branches before creating the PR. It shows a visual representation of the differences between versions of a file, marking additions with a plus sign (+) and removals with a minus sign (-). This format is commonly used in Git-based version control systems.
To make it easier for reviewers to understand the PR, you can add comments and assign specific collaborators to review it. In this case, as you are the sole collaborator, you can assign it to yourself and apply a label for better organization.
Once you are satisfied with the PR details, click “Create pull request” to create the PR.
After creating the pull request, you will be redirected to the “Pull Request Review” page. Here, you can review the changes, check for any merge conflicts, and make final modifications before submitting the pull request.
In this particular case, since there are no conflicts between the base branch and the pull request branch, you can proceed to merge the pull request. When you click “Merge pull request,” you will be taken to a confirmation page. Only after clicking “Confirm merge” are the changes from the feature branch (convert-os-to-platform) integrated into the target branch (main).
And that’s it! You have successfully merged the feature branch into the main branch using a pull request.
In our next blog post, we will delve into the topic of merge conflicts, which arise when changes in the pull request branch and the base branch affect the same lines or sections of a file differently. Stay tuned for more insights on how to handle merge conflicts effectively.
Until then, happy collaborating and happy coding!
(Title): A Beginner’s Guide to Contributing Code to a GitHub Repository
Hello there! Welcome to the second post in our Git/GitHub beginner’s guide series. In the previous post, we learned how to merge branches in your repository. Today, we are going to dive into the exciting world of contributing code to a repository owned by someone else on GitHub.
Let’s start by assuming that you have already created a fork of the repository you wish to contribute to. A fork is essentially a copy of the original repository that you can freely experiment with without affecting the original project.
So you’ve made some changes in the main branch of your forked repository, and now you’re eager to have those changes included in the original repository. The first step is to initiate a Pull Request (PR) from your forked repository to the original repository. This notifies the maintainers of the original repository about your proposed changes and gives them an opportunity to review and merge your code.
To start the PR creation process, navigate to the “Code” tab in your forked repository. You should see a button labeled “Contribute.” Click on it, and GitHub will inform you if there are any mergeable changes between your main branch and the original repository’s main branch.
Once you confirm that there are changes to be merged, click on the “Open pull request” button to proceed. This will take you to the PR creation page. Here, you need to specify the base repository (the original repository) and the base branch (the main branch). For the head repository, choose your forked repository, and select your main branch as the head branch.
After providing these details, click on “Create pull request” to create your PR. You will receive a confirmation that your PR has been opened. Now, all you have to do is wait for the maintainers (in this case, the repository owner) to review your changes and decide whether to accept them.
Once your code has been reviewed, you will be notified about the decision. If, for any reason, you decide against contributing before your changes are merged or rejected, you can simply close the PR by clicking the “Close pull request” button.
And that’s it! You have successfully contributed code from your forked repository to the original repository. GitHub makes it incredibly easy to collaborate and contribute to open source projects, enabling developers to work together seamlessly.
In my next post, I will cover how to merge branches using the Git command line, so stay tuned for that! Meanwhile, feel free to explore the latest IT news and community updates on our platform. Join our IT community and enjoy an ad-free reading experience.
Are you passionate about technology and want to share your knowledge? We are always looking for new authors to contribute to 4sysops. If you’re interested, reach out to us and become part of our writing community.
Happy coding and contributing!