The recently released Proxmox VE 8.2 hypervisor has a built-in wizard for importing virtual machines directly from VMware ESXi hosts. This post explains several scenarios of migrating VMs from VMware ESXi (vCenter) to the Proxmox host.
Importing VMware ESXi Virtual Machines to Proxmox
Let’s look at how to migrate a configured VM from an ESXi host to Proxmox.
Key limitations:
- Supported import of VMs from ESXi versions 6.5 to 8.
- It is not possible to import VM disks from vSAN datastores.
- If the source VM has snapshots, the import will be much slower.
- Also, import performance degrades when copying VMs through vCenter. Direct import from the ESXi host is preferred.
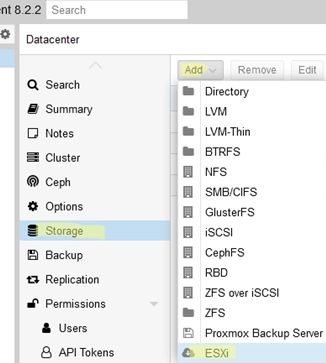
Add an ESXi host (or vCenter) to Proxmox as storage: Datacenter -> Storage -> Add -> ESXi.
Specify the connection name, the FQDN name (IP address) of the ESXi host, and the account to access it (usually root). Check the Skip Certificate Verification option to ignore the VMware host certificates.
Perform several initial steps on the source VM before starting the import. In the case of a VMware VM with a Windows guest operating system:
- Remove the VMWare Tools components from the guest OS. You can use PowerShell to uninstall the VMWare Tools on Windows:
msiexec.exe /x (Get-WmiObject -Class Win32_Product | Where-Object {$_.Name -eq 'VMware Tools'}).LocalPackage - Download and install drivers and integration components (
virtio-win-gt-x64) from the VirtIO ISO image. - If you are using a static IP address on a guest, make a note of the current network interface settings. When migrating, a new virtual network interface can be created and the old one can become hidden (Removing a hidden/ghost network adapter in Windows). Once the migration is complete, manually set the old IP address on the network card.
- It is recommended to shut down the source VM (live migration of a running VM is also possible, but it will take longer).
- Delete VM snapshots (if applicable). Migration takes much longer if VM snapshots are present.
Then select the VM on the ESXi host that you want to migrate to Proxmox and click Import.
The next step is to specify the settings of the new virtual machine on Proxmox that will be used as the migration target. By default, the Proxmox Import Wizard copies the vCPU, RAM, and VM name settings from the source machine. Select the Proxmox storage where you want to save the new VM and the virtual disk format. Although Proxmox supports the VMDK format, it is recommended to use the native virtual disk formats (qcow2 or raw).
Add support for the VirtIO SCSI controller and select VirtIO paravirtualized instead of vmxnet3 as the virtual network adapter in the Advanced tab.
Click the Import button to start copying the virtual machine files.
After the VM transfer is complete, there are a few additional steps you need to take. By default, the VM uses a SATA controller to connect virtual disks. If you connect virtual disks to a VirtIO SCSI controller at this stage, guest Windows will not boot.
First, add a small 1GB hard drive to the VM, connected via a VirtIO SCSI controller.
Then go to the Options tab and enable the QEMU Guest Agent.
Start the Proxmox virtual machine. Wait for the guest Windows to boot (the SCSI controller drivers will be installed automatically). After this, shut down the VM.
Detach and delete the temporary 1 GB disk. Then select the main virtual hard disk in the VM settings and click Detach.
The disk status will change to Unused. Re-attach this hard drive via a SCSI VirtIO single controller.
Then go to the Options tab and edit the VM boot order. Select your SCSI drive as the primary boot device.
Then start the VM, make sure the guest Windows can boot, and check (and change if necessary) the network adapter settings.
Manually Move VM from ESXi Host to Proxmox
In the previous version of Proxmox, you could manually move virtual machines from an ESXi host as follows:
- By importing the VM from the OVF file format. In this case, the first step is to export the VM to the OVF template on the VMware ESXi host. Copy the OVF file to Proxmox and import it into the virtual machine with the command:
qm importovf {vmid} {VM name}.ovf {target storage} - Manually create a VM in Proxmox, and copy the source virtual disk files (VMDK) to storage available in Proxmox. Then attach the VMDK file to the target VM.
Let’s take a closer look at the second method of transferring the VMDK to Proxmox.
- Create a new VM on Proxmox
- Enable SSH on the ESXi host
- Locate the VM files on the ESXi host. Copy the full path to the VM from the vSphere web interface (in the format, /vmfs/volumes/{volume_id})
- Copy
*.VMDKand*-flat.VMDKfiles from the ESXi host to the Proxmox store using thescpcommand:
scp -v root@esxi01:/vmfs/volumes/{volume_id}/win-vm1/win-vm1-flat.vmdk /ZFS1000/

scp -v root@esxi01:/vmfs/volumes/{volume_id}/win-vm1/win-vm1.vmdk /ZFS1000/ - Then import the copied virtual hard disks into the VM on Proxmox with the command:
qm disk import {target VMID} {vmdk file} {target storage}
For example:
qm disk import 113 win-vm1.vmdk ZFS1000 - Follow the additional steps described above to attach new virtual disks to the VM via a SCSI controller.
- Shut down the source VM and power on the new one on the Proxmox host.
So, we have covered several ways to migrate Windows virtual machines from VMware ESXi to Proxmox.
Welcome to our blog! Here, we delve into a variety of exciting topics that ignite curiosity and inspire discussion. Stay tuned for insightful narratives and engaging content.