Ideally, the Windows Subsystem should be installed, updated, or removed using the same command across all supported versions of Windows. However, this is not the case. The issue lies not in the different methods, all leading to the same goal, but in the inconsistencies between OS versions and WSL implementations.
Simple setup with wsl.exe
For the easy installation method, you only run this command:
wsl --install
It downloads WSL from the Microsoft Store and additionally installs the default Linux distribution, which is currently Ubuntu. If you prefer a different distro, you can specify it with the -d or –distribution switch.
To find out the exact names of available distributions, run wsl.exe as follows:
wsl --list --online
Display available Linux distributions
To install Debian, use the following command:
wsl.exe --install -d Debian
Limits of the simple installation
This simple installation using wsl.exe typically works on Windows 11 and Server 2022, but only on the server with desktop. On Server Core, the command either aborts silently or hangs for an extended period, eventually exiting with an error 0xc004000d if virtualization extensions are not available (e.g., in a VM).
Another limitation of this installation method is that it only supports WSL 2. If WSL 1 is needed, for instance, when running Windows in a VM where Nested Virtualization is not possible, you must install the WSL version that is still included with Windows. This optional feature includes WSL 2, but it is no longer updated.
If you install the subsystem via wsl.exe, you will only get the second generation (WSL2)
Basically, wsl.exe is also suitable for installing the subsystem shipped with Windows because it provides a dedicated switch:
wsl --install --inbox
The only difficulty ensues from the fact that wsl.exe does not accept the –inbox switch on Windows Server 2022 Core. Moreover, in Windows Server 2019, the WSL utility is accessible only post the installation of the optional feature.
Configuring WSL as an optional feature
If the Subsystem for Linux isn’t installable on a Windows version via wsl.exe, the conventional method has to be followed. This method involves leveraging the Activate or Deactivate Windows features within the Control Panel on a client; on the server, the task can be completed using the Add Roles and Features Wizard.
Alternatively, execute this command in PowerShell:
Enable-WindowsOptionalFeature -Online -FeatureName Microsoft-Windows-Subsystem-Linux
On the server, you can also use:
Install-WindowsFeature -Name Microsoft-Windows-Subsystem-Linux
For Windows Server 2019, the job is completed at this point since it only supports WSL1. If you want to use WSL2 on Server 2022, you must now also activate the VM platform:
Enable-WindowsOptionalFeature -Online -FeatureName VirtualMachinePlatform
After a restart, you will have WSL2, but you still need to add the Linux kernel separately using:
wsl.exe --update
However, this will not work under Server Core, so you will be stuck with WSL1 even with Server 2022.
Install previews
Similarly to other Windows components that undergo independent development from the operating system, for instance, PowerShell or Windows Terminal, you can experiment with WSL using the current preview versions.
For this purpose, wsl.exe introduces the –pre-release option as a supplement to –install:
wsl --install --pre-release
Nonetheless, at present, this is exclusively supported on Insider previews of Windows 11. For other versions, it is requisite to acquire the WSL installation file from GitHub and execute it.
If you want to upgrade a preview to the latest version, running
wsl --upgrade
will not achieve the goal. Instead, you need to remove the outdated preview first and then install the latest one with the above command.
Installation using winget
WSL is also available as a package for winget. However, it does not provide a uniform installation option, as the package manager is not supported on Windows Server and would need to be set up first.
In theory, you can install WSL with winget on Windows 10 / 11:
winget install "Windows Subsystem for Linux"
In practice, however, the installation got stuck during my test and was not successfully completed.
Determining the WSL version
Before installing the first Linux distribution, it’s recommended to check which WSL version is installed:
wsl.exe --status
By default, Microsoft now activates WSL2. You can explicitly ensure this with the following command:
wsl.exe --set-default-version 2
Moreover, you have the option to select the WSL version for each Linux distribution on a case-by-case basis utilizing the following format:
wsl.exe --set-version <name-of-distribution> 2
Adding a Linux distribution
Now you can proceed to install Linux distributions. This is done on a per-user level, so each account gets its own copy of the distros. If you added the subsystem via wsl.exe, then either the default Ubuntu or the distro specified during installation is already present (unless you used the –no-distribution switch).
Further distros can be added using:
wsl.exe --install -d <Distro>
If you have set up WSL using the optional feature from the OS, this command may result in an error 0x8000ffff.
Alternatively, you can download additional distros from the Microsoft Store on client systems.
Download the latest distro from Github
The above method retrieves distributions from the Microsoft Store. If you want to download the latest distro release from GitHub, the command would look like this:
wsl.exe --install -d Debian --web-download
However, this has the unpleasant side effect that the distro cannot be shut down or removed with wsl -t or wsl –unregister.
In this case, you need to remove the distro through the Settings app or PowerShell:
Get-AppxPackage -Name *kali* | Remove-AppxPackage
Setting up a distribution under Server Core
The approach doesn’t work on Server Core because it doesn’t have a web browser, so APPX can’t be installed the usual way. This is why we use PowerShell to download it with the Invoke-WebRequest command.
Here are the links for each distribution:
- Ubuntu 18.04: https://aka.ms/wsl-ubuntu-1804
- Debian GNU/Linux: https://aka.ms/wsl-debian-gnulinux
- Kali Linux: https://aka.ms/wsl-kali-linux
- OpenSUSE: https://aka.ms/wsl-opensuse-42
- SLES: https://aka.ms/wsl-sles-12
For Ubuntu, you can use the following command in PowerShell:
Invoke-WebRequest https://aka.ms/wsl-ubuntu-1804 `
-OutFile ubuntu-1804.zip -UseBasicParsing
When downloading with Invoke-WebRequest on Server Core, you should use the -UseBasicParsing switch.
APPX is essentially a ZIP archive with a different file extension. The example download above saves the package with the .zip extension because the Expand-Archive cmdlet would otherwise refuse to work. The distribution is extracted with the following command:
Expand-Archive -Path .ubuntu-1804.zip
The contents of the archive will then be in the subdirectory ubuntu-1804, where you can start the .exe file to set up Linux.
Delete distro and WSL
If you want to remove a distro from WSL, terminate it with the command:
wsl.exe -t <Distro name>
and delete it with this command:
wsl.exe --unregister <Distro name>
If you didn’t install a distribution using wsl.exe, you cannot remove it using this utility. In this case, you would use the Settings app or PowerShell, as shown above.
Integrating WSL with Windows Terminal
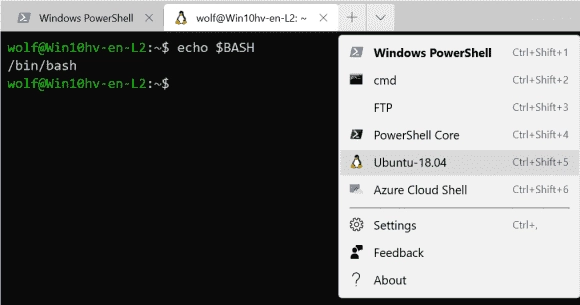
When you install Windows Terminal on a system where WSL is already set up, it automatically creates profiles for the installed distros. As such, you can easily open a new bash window from the menu that has all the shells.
If you are using Windows 11, Terminal comes pre-installed and new shells are not automatically registered. This means you’ll need to manually set up profiles for any Linux distros you want to use.
Automatically created a profile for Ubuntu 18.04 in Windows Terminal.
To do this, open the Terminal settings and execute the Add new profile command. In the next window, click on Duplicate and copy the profile for PowerShell. Then, edit the new profile, change the name, and modify the command line. In doing so, replace
%SystemRoot%System32WindowsPowerShellv1.0powershell.exe
with
%SystemRoot%System32wsl.exe -d <Distro name>
Copy the PowerShell profile in Windows Terminal and customize it for Ubuntu.
Summary
While Microsoft attempts to simplify the installation of the relatively complex Linux Subsystem using wsl.exe, in reality, the setup is still inconsistent. It works reasonably well under Windows 11, as long as you don’t need WSL1 there. Otherwise, you have to deal with two WSL variants: the one from the Store and the one included in the OS.