You can interact with the OpenAI API via curl, Node.js, or Python. This guide is about the Python SDK. Given that Python is the most popular language in AI, it is probably the best way to get started with the OpenAI API..
Get the OpenAI key
I suppose you already have an OpenAI account for ChatGPT. If not, it is about time to register.
After you sign in, click API.
Accessing the OpenAI API settings
When I first signed up, I was able to create an API key without providing credit card details. If I remember correctly, I had 5 dollars of free credits. However, it appears these free credits expire after a while. When I first tried the API SDK, I received the error message Incorrect API key provided. Only after I provided my credit card details and bought new credits was I able to access the API. Note that it is not enough if OpenAI already has your credit card details for ChatGPT.
To enter your payment information, hover with the mouse over the left sidebar under the OpenAI logo, and then click Settings > Billing.
Experimenting with the API shouldn’t cause any financial stress. The charge for 1000 tokens (which translates to input and output words) varies from $0.12 to $0.0010 depending on the model selected. More details can be found on OpenAI’s pricing page. I acquired credits worth $10 and have allocated a $5 monthly budget: Navigate via Settings > Limits
Click API keys located on the left sidebar and subsequently generate a new secret key. Duplicate the key and securely store it. Later retrieval of the key via the OpenAI website is not possible.
Set the OpenAI key on Windows
Open a command prompt and run this command:
setx OPENAI_API_KEY "your-api-key"
Close the command prompt and open a new one to load the environment variable. Note that the above command will set the environment variable permanently. So you don’t have to click through the system settings as the OpenAI guide claims.
Install Python on Windows
On the Python download page, download the latest 64-bit installer, either for Intel or ARM, depending on the architecture of your machine.
When you install Python, make sure to select the Add python.exe to PATH checkbox.
Installing Python on Windows
To verify that the installation was successful, launch a command prompt and run py.
Verifying that Python is installed on Windows
With CTRL+Z ENTER, you can leave the Python prompt.
Install the OpenAI SDK on Windows
To install the OpenAI SDK with the Python package manager pip, run this command:
pip install --upgrade openai
Install the OpenAI SDK with pip on Windows
Set the OpenAI key on maOS
On your Mac, add the environment variable to .zshrc or .bashrc, depending on the shell you are working with. zsh is the default on macOS.
Open a terminal and type this command (or just code .zshrc if you have VS Code installed.)
open -a TextEdit .zshrc
And then set the environment variable:
export OPENAI_API_KEY="your-api-key"
Save the file and then run the next command to load the new environment variable.
source ~/.zshrc
Install Python on macOS
macOS typically comes with Python pre-installed. However, the version of Python that comes installed by default is Python 2.7, which is no longer supported.
I recommend installing Python 3 with Homebrew, the package manager for macOS. If you haven’t installed Homebrew yet, run this command:
/bin/bash -c "$(curl -fsSL https://raw.githubusercontent.com/Homebrew/install/HEAD/install.sh)"
Add Homebrew to your PATH environment variable in .zshrc (or .bashrc if you work with Bash).
nano ~/.zshrc
Include the following in your profile:
export PATH="$PATH:/opt/homebrew/bin"
Save the file and then reload your profile:
source ~/.zshrc
Now you can install Python with Homebrew:
brew install python
Since you now have two Python installations on your Mac, you have to use the python3 command instead of python.
python3 --version
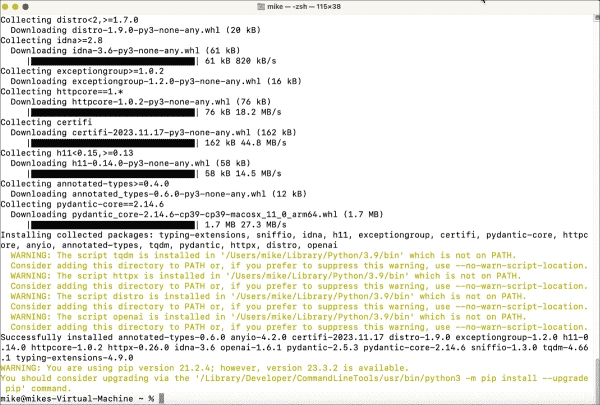
Install the OpenAI SDK on macOS
This also applies to pip. Instead of the pip command, you have to use pip3.
pip3 install --upgrade openai
Install the OpenAI SDK on macOS
Run your first AI script
Create a text file named MyFirstAIScript.py:
<a href="https://openai.com" rel="nofollow" target="_blank">OpenAI</a> is an artificial intelligence research lab. The Python code given here demonstrates how to use OpenAI's API to create an interactive chat bot. First, the <code>openai</code> module is imported and an OpenAI client is initialized.
Next, a function named <code>chat.completions.create</code> is called on the client and provided with two messages. These messages are sent to the <strong>gpt-3.5-turbo</strong> model in the OpenAI library. The first message is from the system and assigns a role to OpenAI’s model, informing it to function as an ‘AIOps assistant’. AIOps stands for artificial intelligence for IT operations, and it basically applies machine learning and data science to IT operations to improve and automate them.
The second message is from a user inquiring about AIOps. The question is “What is AIOps?”
The response from the API is stored in the completion variable and the content of the first choice is printed. This will represent OpenAI’s response to the user’s question about AIOps.</pre>
To run the script on Windows, use this command:
py MyFirstAIScript.py
And this on macOS:
python3 MyFirstAIScript.py
