The first step to install Kubernetes on Windows 10/11 or Windows Server 2019/2022 is to download the installation files of the current version from GitHub. The page minikube start lists the system requirements and describes the first steps.
If Minikube is operated in a VM, it should have at least two vCPUs, 2 GB of RAM, and 20 GB of free disk space.
Nested virtualization necessary
If Docker and Minikube are to run in a VM on WSL2, nested virtualization should be activated. Follow these steps under Hyper-V:
Set-VMProcessor -VMName <Name of the VM> `
-ExposeVirtualizationExtensions $true
Get-VMNetworkAdapter -VMName <Name of the VM> |
Set-VMNetworkAdapter -MacAddressSpoofing On
There is no feedback for these commands if the modification has been successful.
Deploy Docker or a virtualization solution for Kubernetes
Kubernetes can be built on a computer that has either virtualization software or a container solution. Your options include Docker, QEMU, Hyperkit, Hyper-V, KVM, Parallels, Podman, VirtualBox, or VMware WoVMware Workstation.
This guide specifically uses Docker as an example. That being said, it’s recommended that you have Docker Desktop for Windows installed on your computer in advance. Instead of Hyper-V, you can opt to run the containers in the Windows Subsystem for Linux 2.0 (WSL2).
Update WSL Kernel in Windows 11
On many systems, after installing Docker, a notice appears that WSL2 needs to be updated. This is done with this command:
wsl --update
Generally, it is advisable to restart the computer afterward.
After the installation, verify the installed version with this command:
docker version
This also shows whether Docker is working on the test PC.
Operate Minikube
After downloading, the Minikube start file minikube.exe can be found in the target directory. This folder must be added to the system path. This can be done in a PowerShell session with elevated rights:
After opening a new PowerShell session, the command minikube shows the online help. This indicates that Minikube is now working and the cluster can be set up.
Calling Minikube without parameters outputs the online help
Setting up a Kubernetes Cluster with Minikube
To create a Kubernetes cluster with Minikube, enter this command:
minikube start
Minikube downloads then the necessary files for the Kubernetes container.
It is important here that the Docker service is started. If not, it is best to reboot the PC.
The status of Minikube can be displayed as follows:
minikube status
Now, for example, you can display all its resources with this command:
kubectl get all
And with this command you check if the cluster endpoint is working and determine the cluster’s IP address:
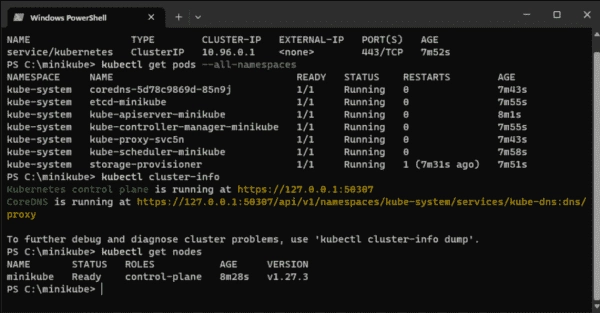
kubectl cluster-info
Further commands that provide a quick overview of the environment include:
- Kubectl get services: Services in the namespace
- Kubetcl get pods –all-namespaces: All pods in all namespaces
- Kubectl get pods -o wide: Extended information about the pods in the general namespace
- Kubectl get deployment <Deployment>: Information about a specific deployment
- Kubectl get pods: Pods in the current namespace
- Kubectl get nodes: Nodes in the cluster
With the describe parameter, further information can be displayed for various objects, such as the nodes:
kubectl describe nodes
Display Information about Pods and Cluster
Summary
Minikube facilitates the easy establishment of a Kubernetes cluster for a lab environment and to gain primary exposure to container orchestration.
The installation within a Windows VM requires an active nested virtualization and Docker for Windows to be set up, ideally on WSL2.