In this article, we’ll examine how to employ Microsoft’s official HardwareReadiness.ps1 PowerShell script to run a bulk Windows 11 hardware compatibility check on domain computers.
This script ascertains that the computer meets the following minimum criteria to run Windows 11:
- A compatible x64 processor (complete list of supported CPUs)
- At least 4 GB of RAM
- A minimum of 64 GB hard drive size
- A device that has UEFI and Secure Boot enabled
- A video card that is compatible with DirectX 12 and has WDDM 2.0 drivers
- A TPM 2.0 module
To manually verify if a specific machine’s hardware is in compliance with the requirements of Windows 11:
- Download the HardwareReadiness.ps1 script by clicking here.
- Launch an elevated Windows PowerShell console (this script utilizes the
Get-WMIObjectcmdlet, which is not supported in latest versions of PowerShell Core) - Activate PowerShell script execution in the existing session with the following command:
Set-ExecutionPolicy -Scope Process RemoteSigned - Commence the script using the following command:
.HardwareReadiness.ps1
Once executed, the script should return the code 0. This indicates that your machine satisfies the hardware requirements for Windows 11 (the output would be returncode:0 , returnresult=CAPABLE).
{“returnCode”:0,”returnReason”:””,”logging”:”Storage: OSDiskSize=427GB. PASS; Memory: System_Memory=32GB. PASS; TPM: TPMVersion=2.0, 0, 1.38. PASS; Processor: {AddressWidth=64; MaxClockSpeed=3901; NumberOfLogicalCores=12; Manufacturer=AuthenticAMD; Caption=AMD64 Family 25 Model 80 Stepping 0; }. PASS; SecureBoot: Capable. PASS; “,”returnResult”:”CAPABLE”}
If you need to conduct a large-scale Windows 11 compatibility check on enterprise computers, a feasible tool to use would be this PowerShell script. This Script effectively gathers information through mediums like SCCM, Intune, or even WSUS, whose capabilities extend to deploying third-party software and scripts. In more straightforward scenarios, execution of this PowerShell script via Group Policies and storing the results in the properties of the computer object in Active Directory proves to be sufficient.
Keep in mind that the original source code of the script will need to be slightly adjusted.
A point of note is that this PowerShell script file is digitally signed by Microsoft. It is however important to keep in mind that the signing certificate expired in 2022.
Edit the HardwareReadness.ps1 file and append the provided snippet of code at its conclusion, specifically before #SIG # Begin signature block:
$outObject = $outObject | ConvertTo-Json -Compress

$computer = $env:COMPUTERNAME

$ComputerSearcher = New-Object DirectoryServices.DirectorySearcher

$ComputerSearcher.SearchRoot = "LDAP://DC=WOSHUB,DC=LOC"

$ComputerSearcher.Filter = "(&(objectCategory=Computer)(CN=$Computer))"

$computerObj = [ADSI]$ComputerSearcher.FindOne().Path

$computerObj.Put( "Info", $outObject )

$computerObj.SetInfo()
This above PowerShell script completes the task of entering Windows 11 compatibility data into the ‘Info’ computer attribute located within Active Directory.
Ensure to copy the aforementioned PS1 script file into the directory labeled \woshub.locNetlogon present on the domain controller.
Open the Domain Group Policy Management console (gpmc.msc), create a new GPO, and link it to the computer’s OU.
Navigate to Computer Configuration -> Policies -> Windows Settings -> Scripts (Startup / Shutdown) -> Startup -> tab PowerShell Scripts, and specify the UNC path to the HardwareReadiness.ps1 script
Go to Computer Configuration -> Administrative Templates -> System -> Group Policy. Enable the policy Configure Logon Script Delay and set a 1-minute script execution delay.
Also, enable the Always wait for the network at computer startup and logon option under Computer Configuration -> Admin Templates -> System -> Logon.
Read more about how to run logon PowerShell scripts via GPO.
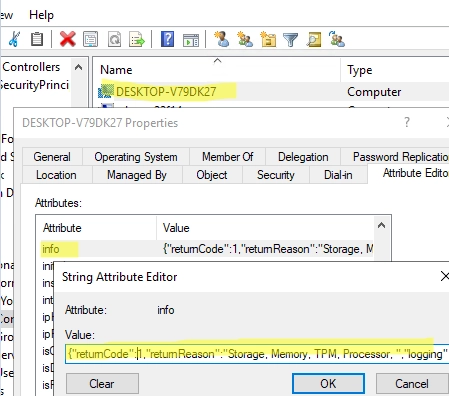
Reboot the client’s computer. Start the ADUC console (dsa.msc) and open the computer properties. Go to the Attribute Editor tab and check that the Info parameter now contains the results of checking your computer for Windows 11 compatibility. In the Attribute Editor tab, check that the Info parameter now contains the results of your computer’s Windows 11 compatibility check.
Once the logon script has been run on all computers, you can quickly view information about compatible and incompatible computers from Active Directory by using the Get-ADComputer cmdlet:
Get-ADComputer -Filter {enabled -eq "true"} -properties *| Where-Object {$_.info -ne $null}
For more detailed information about incompatible computers and specific computer hardware that does not meet the Win 11 minimum requirements, run the following PowerShell script:
$Report = @()
$computers = Get-ADComputer -Filter {enabled -eq “true”} -properties *| Where-Object { $_.Info -match ‘”returnCode”:1’}
foreach ($computer in $computers){
$jsonString =$computer.info
$object = $jsonString | ConvertFrom-Json
$returnReasonValues = $object.returnReason -split ‘, ‘
$CompInfo = [PSCustomObject]@{
“Computer” = $computer.name
“NonCompatibleItems” = $returnReasonValues
}
$Report += $CompInfo
}
$Report|fl