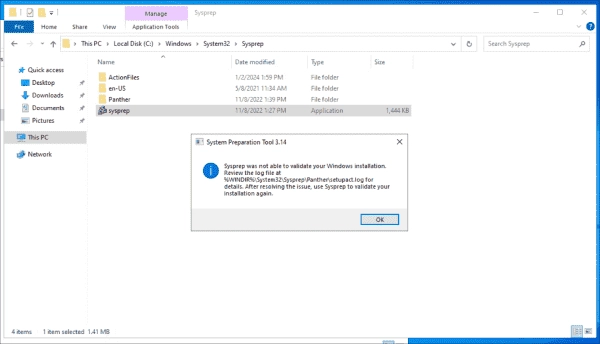
Sysprep is a built-in Windows tool used to generalize OS images before deploying them to multiple machines. There are several reasons why Sysprep fails, but the error message usually states that the validation of the Windows installation has failed.
Sysprep was not able to validate your Windows installation
If Sysprep fails to create the generalized image, the first step is to check the setupact.log file. This log file can provide valuable information to help troubleshoot and resolve the Sysprep errors.
Identifying Sysprep errors in setupact.log
Sysprep generates a log file upon successful or failed completion. The log file setupact.log is located at %WINDIR%System32Panther.
setupact.log – The Sysprep log file
Based on the errors found in the setupact.log file, you can identify the root cause and apply the corresponding fixes. In the following section, we will address the known issues.
Sysprep failed to remove apps for the current user
When Sysprep encounters a failure, this is often due to conflicts that arise with Microsoft applications. A case in point is when Sysprep doesn’t succeed in removing the Microsoft Edge package, as illustrated in the following example.
The subsequent error message found in setupact.log is as follows:
SYSPRP Package Microsoft.MicrosoftEdge.Stable_120.0.2210.91_neutral_8wekyb3d8bbwe was installed for a user, but not provisioned for all users. This package will not operate in the sysprep image.
SYSPRP Failed to remove apps for the current users: 0x80073cf2.
In this scenario, the error SYSPRP Failed to remove apps for the current user implies that the Microsoft Edge package couldn’t be deleted. However, you can manually uninstall it by using PowerShell.
To do this, firstly launch PowerShell as Administrator and then run the following command:
SYSPRP Failed to remove apps for the current users: 0x80073cf2
Get-APPXPackage Microsoft.MicrosoftEdge.Stable Remove-APPXPackage
If you rerun Sysprep, the image will be generalized correctly.
This example is specific to the Microsoft Edge.Stable package. However, the issue can also occur in other apps. You can check for affected apps in the setupact.txt log file.
Audit mode can’t be turned on if there is an active scenario
If pending updates exist on your machine and you then run Sysprep, setupact.log will contain the following error message:
Error SYSPRP: Audit mode can’t be turned on if there is an active scenario.; hr = 0x800F0975.
Sysprep will not work if there are active or pending updates. First, finish installing any pending updates, restart your Windows machine, and then rerun Sysprep.
Syprep fails after installing updates
Sometimes, Sysprep fails after you install new updates on your reference machine. The easiest solution is to uninstall the new updates and then rerun Sysprep.
- Navigate to Programs and Features > Installed Programs.
- Identify and select the update.
- Right-click on the update and then click Uninstall.
- Reboot Windows.
- Run Sysprep.
Make sure that the updates are installed after you deploy the image.
Error SYSPRP BitLocker-Sysprep
If you are using BitLocker to encrypt disks, you will encounter the following error in setupact.log when you run Sysprep:
Error SYSPRP BitLocker-Sysprep: BitLocker is on for the OS volume. Turn BitLocker off to run Sysprep. (0x80310039).
As the error implies, you must suspend BitLocker before running Sysprep. Open the File Explorer and follow these instructions:
- Navigate to This PC.
- Click on the encrypted disk and then select Manage BitLocker.
- Click Suspend protection.
- Rerun Sysprep.
A fatal error occurred while trying to Sysprep the machine
If you try to run Sysprep more than three times on the same image, you will receive this error message:
A fatal error occurred while trying to Sysprep the machine.
In the Setuperr.log file, you may encounter the following error messages:
Error [0x0f0082] SYSPRP LaunchDll: The incident occurred while executing ‘C:WindowsSystem32slc.dll, SLReArmWindows’, returned error code -1073425657
Error [0x0f0070] SYSPRP RunExternalDlls: There was an error running registry sysprep DLLs, which brought the sysprep execution to a halt. dwRet = -1073425657
Error [0x0f00a8] SYSPRP WinMain: Hit failure while processing sysprep generalize providers; hr = 0xc004d307
This error occurs when the Windows Software Licensing Rearm program runs thrice in a single image.
To avoid this error, you need to edit the SkipRearm key. This will allow you to run Sysprep more than three times.
- Run Registry Editor as an administrator.
- Navigate to ComputerHKEY_LOCAL_MACHINESOFTWAREMicrosoftWindows NTCurrentVersionSoftwareProtectionPlatform.
- Right-click on SkipRearm and click Edit.
- Enter 1 if it’s not already there, and then press Enter.
Please note the ‘Edit SkipRearm key’ from the image in the source for complete guidance.
Sysprep will not run on an upgraded OS
If you upgraded Windows, for instance, from Windows 10 to Windows 11, you will encounter the following error:
Error SYSPRP: Sysprep will not run on an upgraded OS. You can only run Sysprep on a custom (clean) install version of Windows.
The primary solution to this problem is to begin anew and install the upgraded Windows version from scratch. However, if you’ve spent a significant amount of time configuring the old image, this solution might not be the perfect fit.
The workaround below allows you to bypass the error by modifying the CleanupState registry key.
- Launch the Registry Editor with admin rights.
- Go to HKEY_LOCAL_MACHINESYSTEMSetupSysprepStatus.
- Right-click on the CleanupState key and alter the key to value 2.
- Right-click on the GeneralizationState key in registry and click the Edit option.
- If 7 is not present already, input it and confirm with OK.
- Reboot your Windows system.
- Execute Sysprep.
If you face any other errors when Sysprep fails, please post a comment below.