As you may be aware, Microsoft has recently rebranded Azure Active Directory to Microsoft Entra ID. This change may cause confusion in some cases, particularly with the Microsoft Entra Connect tool. Although the documentation already refers to it as Microsoft Entra Connect, the download page still refers to it as Azure AD Connect V2. Furthermore, the application itself is still labeled Azure AD Connect. For the sake of consistency, I will refer to it as Azure AD Connect or simply AD Connect throughout this post.
AD Connect is a tool used for hybrid identity deployments and synchronization of your local Active Directory objects to the cloud. In smaller environments, the tool is typically installed on a domain controller, but it can also be installed on different servers. There can be only one active AD Connect server synchronizing the objects in your environment. When you need to upgrade or decommission the server running AD Connect, you need to migrate it. You can also use this process to upgrade AD Connect to a higher version. Microsoft calls this swing migration.
The current version of Azure AD Connect V2 requires at least Windows Server 2016. In this guide, I am installing it on a Windows Server 2022 domain controller.
Export current configuration
The first step is to export the configuration from the current server. Open AD Connect, click Configure, and select View or export current configuration.
Click the Export Settings button to save the result file, ideally directly to the new server or a network share.
Note: Make a note of the account name that is shown. You might need this information later during the cleanup phase.
Next, check the current user sign-in settings (this is not part of the export). To do so, click Previous and then select Change user sign-in. Make a note or take a screenshot of the settings.
Note that not everything is stored in the exported file, such as custom sync rules. These must be migrated manually. More information can be found here.
Install Azure AD Connect on a new server
If you haven’t done so yet, now is the time to download Azure AD Connect. Once done, run the MSI package to get started. First, you need to accept the license terms. Next, click Customize on the Express Settings screen. Select the Import synchronization settings checkbox and provide a path to the exported JSON file.
Click Install to get to the User Sign-in settings. Select the same settings that you noted from the current server. In my case, it was Password Hash Synchronization only, and click Next. On the Connect to Azure AD screen, enter your Azure account with at least the Hybrid Identity Administrator user role, and click Next.
On the Connect your directories screen, first select the forest to synchronize.
As you can see, I have a red x next to the domain name. This is because I must specify an account that AD Connect should use to read Active Directory. Click Change Credentials. There are two options: let AD Connect create a new account or use an existing account with the required permissions. In my case, I let the tool create an account for me. The account name is in the format MSOL_XXXXXXXX.
Once you configure the AD account, the mark next to the domain name will turn green, and you can click Next to review the configuration. There are two checkboxes on the Ready to configure screen. The first starts the synchronization process once the wizard is completed. Pay close attention to the Enable staging mode… checkbox and make sure it’s checked. As already mentioned, only one AD Connect server can actively sync the changes at any time, so the server you are currently installing must go to staging mode. Staging mode prevents the server from syncing any local changes back to the cloud.
Click Install to complete the wizard. It will take several minutes to do so.
The wizard also suggests checking the imported configuration against the exported configuration. You can do so using your favorite text editor, for example, Notepad++. Note that small differences in the JSON file are expected, such as the AD Connect version number, new server hostname, new username, etc.
Note: If you had any custom synchronization rules defined, make sure to create them again on the new server.
Verify synchronization results
Once the tool itself is installed, you need to verify that the synchronization works properly. Remember the two checkboxes on the Ready to configure screen? The first was to Start the synchronization process when the configuration completes. If you have left it checked, the tool will immediately sync. To check the results, run the Synchronization service from the Start menu. Here, you can see that a full import and sync was done successfully.
Initial synchronization results
Note: If you want to see exactly which objects (users, groups, etc.) the server will synchronize, you can create an Excel export from the AD Connect tool. To do so, use the steps described in the Verify section in this Microsoft document.
Changing the active server
Once you have installed and verified that the synchronization is working as expected, it is time to perform the AD Connect server switch. To do so, you must enable Staging mode on the old server and disable it on the new server. First, run the AD Connect tool on the old server and select Configure staging mode.
Next, check the Enable staging mode box and finish the wizard. Once completed, run AD Connect on the new server and again select Configure staging mode. Here, you must uncheck the Enable staging mode box.
On the Ready to configure screen, be sure to check the Start the synchronization process when the configuration completes and click Configure.
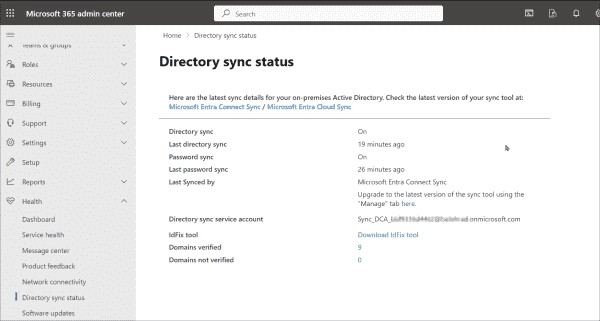
Once the wizard is complete, you should again check the synchronization results as described in the Verify synchronization results section. You can also log in to the Microsoft 365 admin center and check the Directory sync status screen under the Health section.
Postmigration cleanup
That’s it! You have migrated Azure AD Connect to a new server. It’s now time to proceed with the cleanup. Let’s recall the export configuration step where we discussed noting down the MSOL_XXXXXXX account name that’s displayed by AD Connect? This account, previously used by the old server to read Active Directory, is now redundant as we’ve set up a new one during the installation process and can be removed.
A possibly lingering service account is the one used by the Microsoft Azure AD Sync service (accessible in services.msc). This account can also be safely deleted.
The last step consists of uninstalling the AD Connect tool from the old server. This action is carried out through Programs and Features (utilizing appwiz.cpl), following standard procedures. In the ensuing uninstall wizard, opt for Also uninstall support components if they aren’t required for other software you may have installed. However, if your plan is to completely decommission the old server, then this step is redundant, and it’s sufficient to just purge the user accounts.