The new Teams client is a Progressive Web App running on Edge WebView2. According to Microsoft, this technology shift ensures better performance and lower resource consumption. Additionally, the company promises easier usability.
The new client has been officially available since October 2023. However, companies initially have the option to continue using the old frontend or switch between the two clients. After March 31, 2024, all users will receive the new client if they haven’t installed it by then.
Differences in the features
With the launch of the new client, no updates or new features are being introduced to the classic version. They are instead intended for the updated version, which includes new additions like the Copilot integration and the capability for cross-tenant communication and collaboration.
However, several features from the original client are not present in the new Teams client, or they must be accessed differently. For example, the new Teams client does not allow for contacts access in chat. Instead, this function is managed by the new People app. Similarly, the Activities tab is not available in the new client.
The differences between the classic and new Teams clients have been summarized in the Microsoft documentation.
How to install the new Teams
Microsoft recently released the bulk installer for Teams. This is teamsbootstrapper.exe, a command-line tool. It can be downloaded here.
The program allows for the installation of Teams both online and offline. The minimalist software does not offer a help option and foregoes any output during execution.
To download the installation package for the Teams client from the internet, enter the following command in PowerShell:
.teamsbootstrapper.exe -p
If you prefer to keep the installation files locally, you’ll need to download them first (MSIX x86, MSIX x64, ARM64) and then point the tool to the MSIX files:
.teamsbootstrapper.exe -p -o “c:directoryteams.msix”
Alternatively, you can specify a UNC path instead of a local folder.
PowerShell script for deployment
If you aim to implement the new Teams client using Configuration Manager and utilize the bulk installer, you need to make sure you’re always using the tool’s most updated version.
The PowerShell script Install-MSTeams.ps1 simplifies this procedure and provides several other client installation alternatives.
Check system requirements
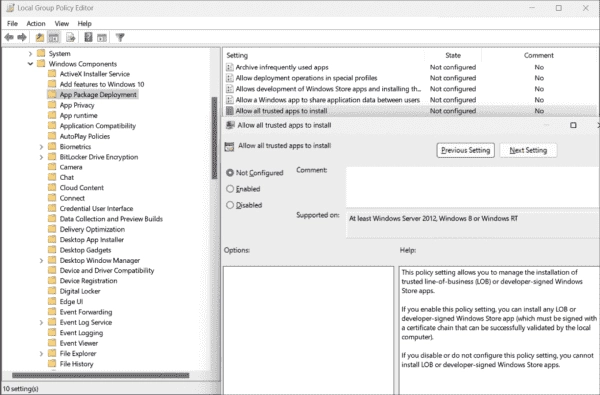
Prior to deployment, it’s critical to assure that all targeted devices meet the necessary system requirements. This also involves enabling app sideloading via the corresponding group policy under Computer Configuration => Policies => Administrative Templates => Windows Components => App Package Deployment: Allow all trusted apps to install
In addition, a current version of WebView2 should be installed, and the delivery optimization should be activated.
Migration through policy
Rolling out the new client to all devices doesn’t necessarily mean it has to be immediately activated everywhere. Instead, admins can use policies in the Teams Admin Center to determine which client is set as the default or exclusively used.
If one client is set as the default, users can switch to the new Teams from the classic client (since version 1.6.00.4472) via a toggle at the top left. This will install the new client immediately if necessary.
Setting the version of the Teams client via update policies.
Additionally, you can either disable the new frontend or set it as an exclusive option. Opting for exclusive use of the new Teams client will result in the classic client being uninstalled. If it’s disabled, the toggle in the classic Teams disappears.
These policies support a gradual rollout. For example, admins could initially assign the new client as the default or exclusive option for a pilot ring and then gradually transition other user groups.
These policies can be queried and modified not only in the Teams admin center but also via PowerShell using the Teams module, which includes the following cmdlets for this purpose:
- Get-CsTeamsUpdateManagementPolicy
- Set-CsTeamsUpdateManagementPolicy
The latter requires the name of the policy for the Identity parameter, and you can cycle through the available settings using auto-completion. A call to this cmdlet looks like this:
Set-CsTeamsUpdateManagementPolicy -Identity Global -AllowPublicPreview $false
Summary
The new Teams client brings significant changes for end-users and admins. As all new features since its release last year are exclusive to it, companies must consider migrating to the new frontend.